# GPU 使用指南
在开始之前,请先确认您使用的模型是基于哪种深度学习引擎,然后按照对应引擎的步骤进行配置。
# PyTorch引擎GPU使用
# 1、安装 NVIDIA 显卡驱动
使用 GPU 前需安装 NVIDIA 驱动:
- Linux:版本 ≥
570.124.06 - Windows:版本 ≥
572.61
# 2、安装 CUDA 和 cuDNN
建议安装以下版本:
- CUDA:v12.8
- cuDNN:v8.9.7
下载安装链接:
安装好之后需要重启电脑,验证安装是否成功:
nvcc -V
若输出包含 v12.8,则说明安装成功。
# 3、下载离线依赖库
仅适用于Pytorch引擎的模型
# 确保引入pytorch-jni依赖
<dependency>
    <groupId>ai.djl.pytorch</groupId>
    <artifactId>pytorch-jni</artifactId>
    <version>2.7.1-0.34.0</version>
    <scope>runtime</scope>
</dependency>
# PyTorch GPU依赖库
默认情况下,系统会自动识别当前平台并联网下载对应的依赖库。如果当前环境无法联网或网络不稳定,也可以选择手动下载依赖。
手动下载地址:百度网盘 (opens new window)
下载后,将对应系统的依赖库解压到缓存目录:{缓存路径}/pytorch 下。
例如,在 Windows 系统中,缓存目录可能为:
C:\Users\Administrator\smartjavaai_cache\pytorch\2.7.1-cu128-win-x86_64
如果未自定义缓存路径,将使用默认缓存目录。关于缓存路径的更多说明,请参考:缓存说明
# 5、配置系统环境变量(Windows)
# 代码中指定GPU
SmartJavaAI 默认使用 CPU。如需使用 GPU,需要手动指定设备类型:
FaceModelConfig config = new FaceModelConfig();
config.setModelEnum(FaceModelEnum.RETINA_FACE); // 人脸模型
config.setDevice(DeviceEnum.GPU);// 指定 GPU
config.setGpuId(0);// 指定 GPU ID
FaceModel faceModel = FaceModelFactory.getInstance().getModel(config);
# 缓存目录说明
| 系统 | 缓存目录 |
|---|---|
| Windows | C:/Users/{user}/smartjavaai_cache |
| Linux | /root/smartjavaai_cache |
| macOS | /Users/{user}/smartjavaai_cache |
# 配置步骤
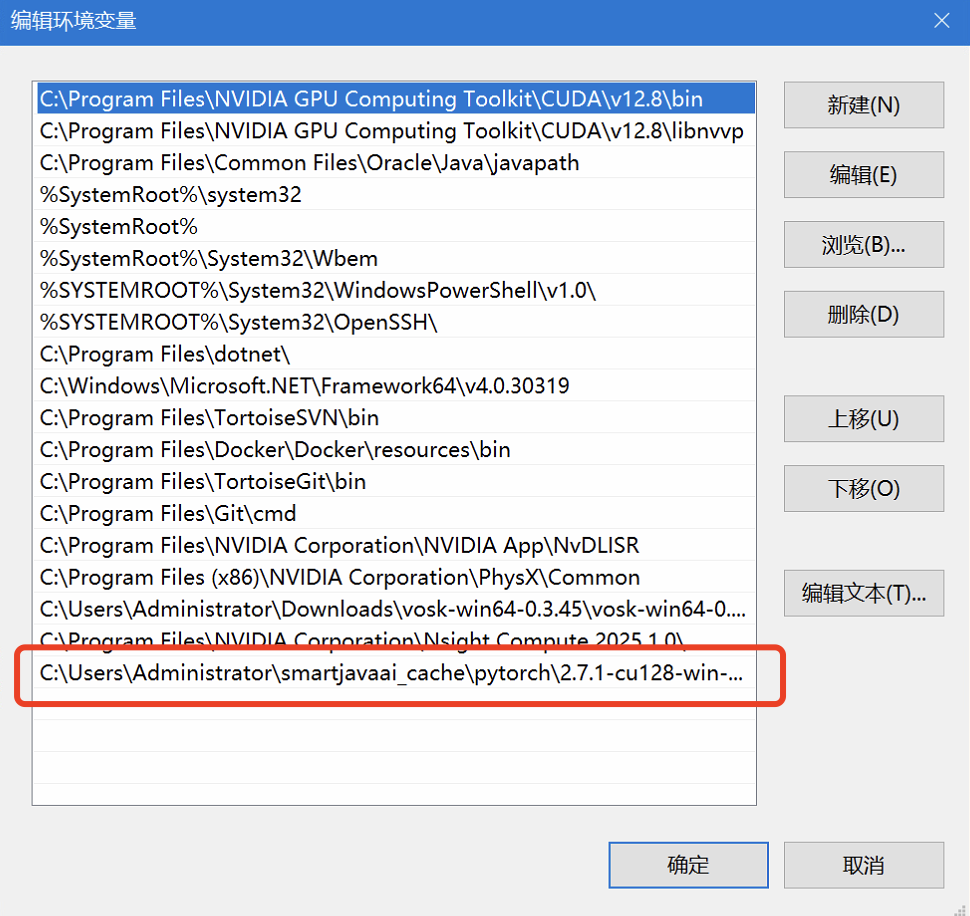
打开缓存路径,定位至目录:
pytorch/2.7.1-cu128-win-x86_64
注意事项
如果在缓存目录中找不到 pytorch/2.7.1-cu128-win-x86_64 目录,请检查前面的步骤是否完成
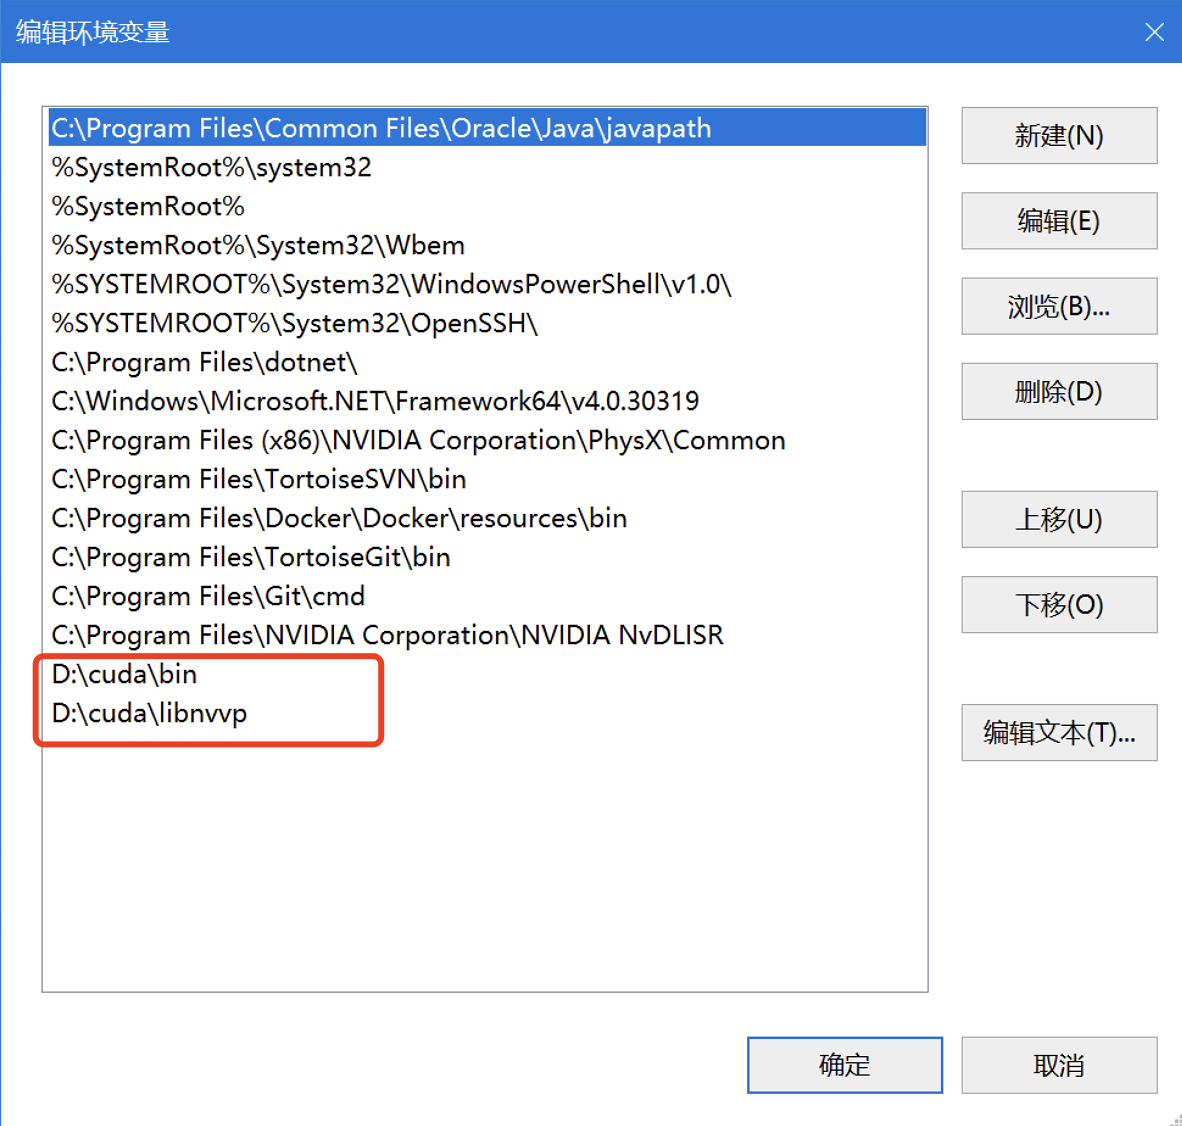
- 将该目录添加到 系统环境变量
PATH中。 - 删除原有 CUDA 路径,避免冲突。
- 修改环境变量后一定要重启你的IDE或者重启电脑。
示例图:
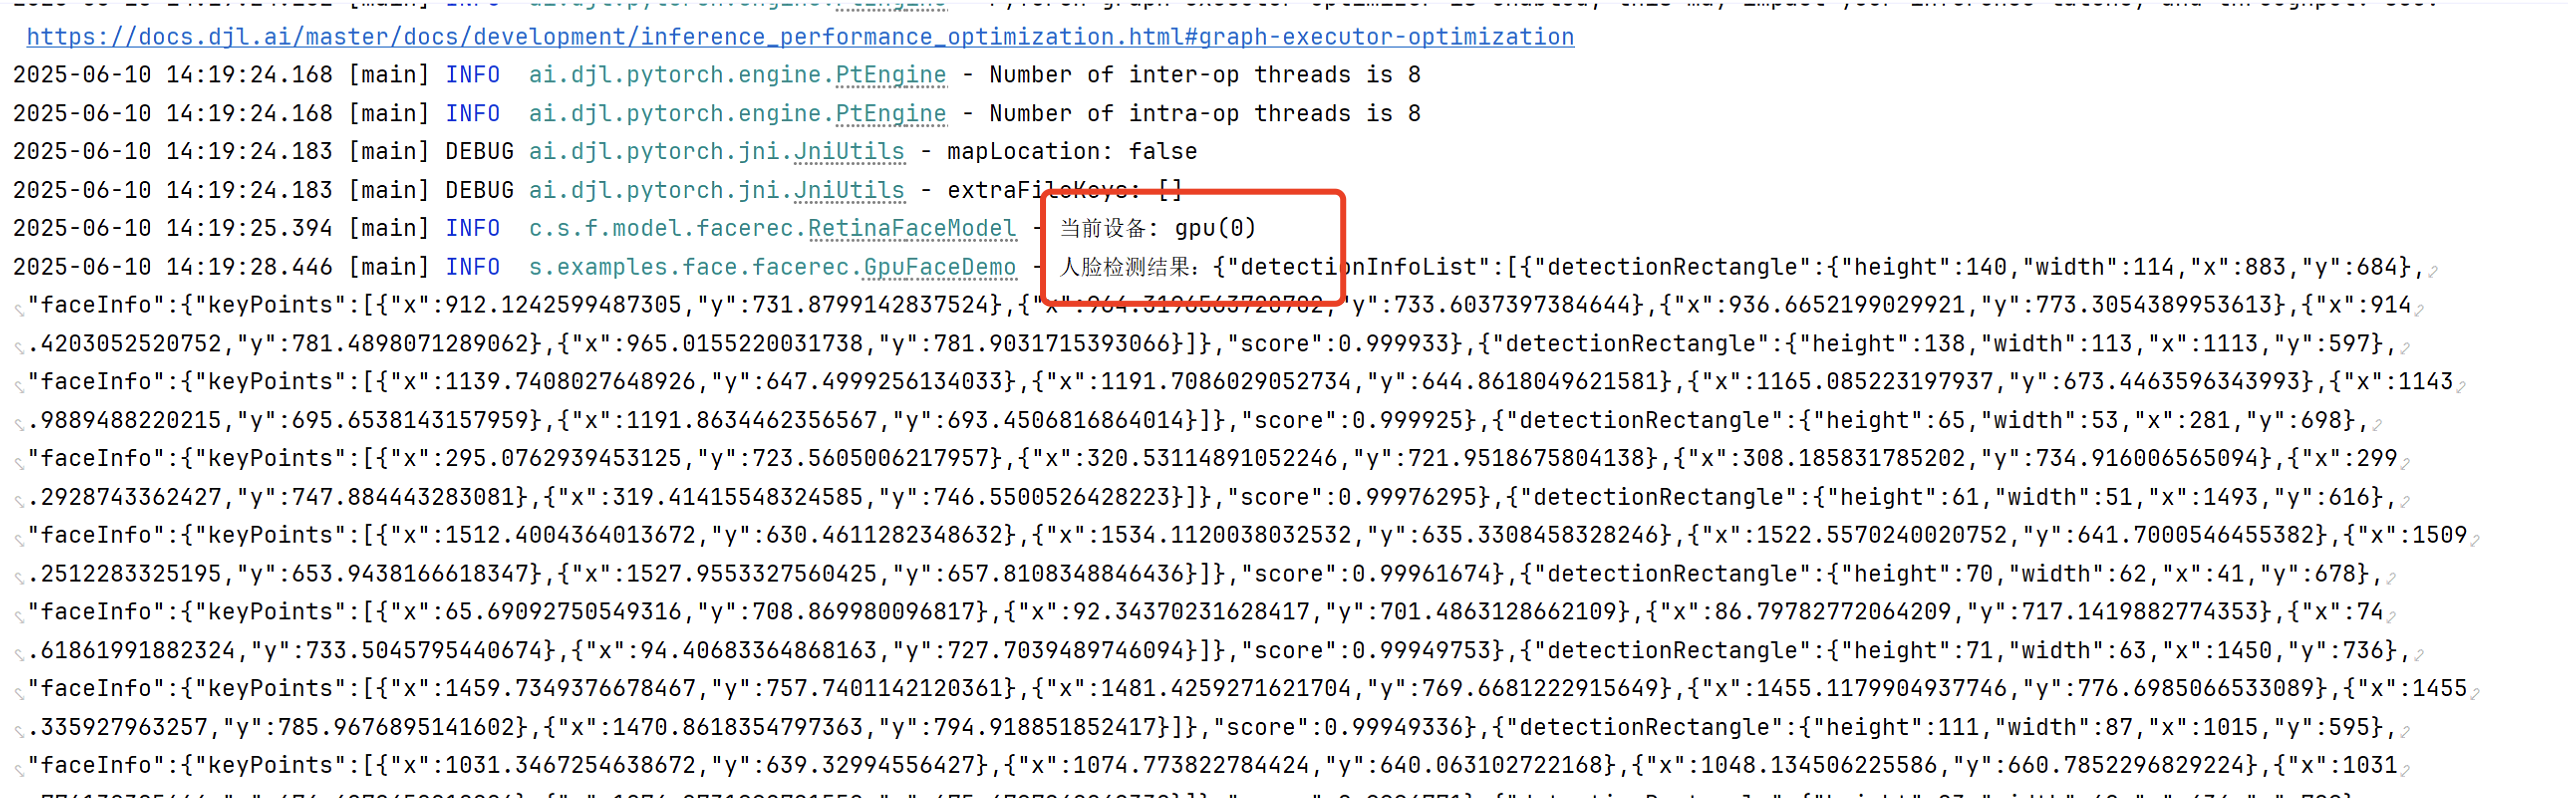
5、前面的步骤操作完成后,重新运行程序,运行成功示例:
# Seetaface6模型GPU使用
- 1、使用 Seetaface6 模型需要安装CUDAv11.6.2
- 2、将CUDA加入到系统环境变量(PATH)中
按照如上的步骤,即可正常使用Seetaface6的GPU模式
# ONNX Runtime引擎GPU使用指南
OCR 模块使用的推理引擎为 ONNX Runtime。在完成PyTorch GPU 配置步骤(前 4 步)后,还需执行以下操作以启用 GPU :
- 1、排除onnxruntime的CPU版本
- 2、引用onnxruntime_gpu
注意: 如果项目中还引入了其他 SmartJavaAI 模块,务必确保统一排除其传递依赖中的 onnxruntime(CPU 版本),否则可能导致运行时冲突或 GPU 失效。
<dependency>
   <groupId>cn.smartjavaai</groupId>
   <artifactId>ocr</artifactId>
   <scope>runtime</scope>
   <exclusions>
      <exclusion>
         <groupId>com.microsoft.onnxruntime</groupId>
         <artifactId>onnxruntime</artifactId>
      </exclusion>
   </exclusions>
</dependency>
<dependency>
   <groupId>com.microsoft.onnxruntime</groupId>
   <artifactId>onnxruntime_gpu</artifactId>
   <version>1.20.0</version>
   <scope>runtime</scope>
</dependency>
# 常见错误与解决方法
# 示例错误日志1:
ai.djl.engine.EngineException: Could not run 'aten::empty_strided' with arguments from the 'CUDA' backend.
This could be because the operator doesn't exist for this backend,
or was omitted during the selective/custom build process (if using custom build).
If you are a Facebook employee using PyTorch on mobile, please visit https://fburl.com/ptmfixes for possible resolutions.
'aten::empty_strided' is only available for these backends: [CPU...].
问题原因: 安装的cuda/cudnn版本不匹配
解决方案: 请使用文档中要求的版本安装
# 示例错误日志2:
Caused by: java.lang.UnsatisfiedLinkError: C:\Users\Administrator\smartjavaai_cache\pytorch\2.5.1-20241113-cu124-win-x86_64\torch_cuda.dll: Can't find dependent libraries
at java.base/java.lang.ClassLoader$NativeLibrary.load0(Native Method)
at java.base/java.lang.ClassLoader$NativeLibrary.load(ClassLoader.java:2437)
at java.base/java.lang.ClassLoader$NativeLibrary.loadLibrary(ClassLoader.java:2494)
at java.base/java.lang.ClassLoader.loadLibrary0(ClassLoader.java:2694)
at java.base/java.lang.ClassLoader.loadLibrary(ClassLoader.java:2624)
at java.base/java.lang.Runtime.load0(Runtime.java:765)
at java.base/java.lang.System.load(System.java:1852)
at ai.djl.pytorch.jni.LibUtils.loadNativeLibrary(LibUtils.java:379)
at ai.djl.pytorch.jni.LibUtils.loadLibTorch(LibUtils.java:195)
at ai.djl.pytorch.jni.LibUtils.loadLibrary(LibUtils.java:82)
at ai.djl.pytorch.engine.PtEngine.newInstance(PtEngine.java:53)
... 39 more
问题原因: cuda环境变量配置不正确
解决方案: 可以查看配置系统环境变量
# 示例错误日志3:
Caused by: java.lang.Exception: Compute device gpu has no memory device registered. Please call RegisterMemoryDevice firstly.
 at com.seeta.sdk.FaceDetector.construct(Native Method)
 at com.seeta.sdk.FaceDetector.<init>(FaceDetector.java:17)
 at com.seeta.pool.FaceDetectorPool$1.makeObject(FaceDetectorPool.java:37)
 at org.apache.commons.pool2.impl.GenericObjectPool.create(GenericObjectPool.java:566)
 at org.apache.commons.pool2.impl.GenericObjectPool.borrowObject(GenericObjectPool.java:306)
 at org.apache.commons.pool2.impl.GenericObjectPool.borrowObject(GenericObjectPool.java:233)
 at cn.smartjavaai.face.model.facerec.SeetaFace6Model.extractFeatures(SeetaFace6Model.java:853)
 ... 29 more
问题原因: Seetaface6没有正确加载到gpu的依赖库
解决方案: 请使用SmartJavaAI最新版本,历史版本有可能存在兼容性问题
# 示例错误日志4:
java.lang.UnsatisfiedLinkError: C:\Users\Administrator\smartjavaai_cache\seetaface6\tennis.dll: Can't find dependent libraries
问题原因: 使用Seetaface6模型,cuda未安装或版本不正确
解决方案: 请安装cuda v11.6.2版本,并配置系统环境变量
← 离线使用 Docker 部署指南 →