# 人脸识别
# 简介
SmartJavaAI 人脸模块支持以下功能:
- 人脸检测:5点人脸关键点定位
- 人脸识别:人脸512维特征提取、人脸对齐、1:1 人脸比对、1:N 人脸识别
- 人脸库:人脸注册、更新、查询、删除(支持向量数据库milvus/sqlite)
- 人脸属性检测:性别、年龄、口罩、眼睛状态、脸部姿态
- 静默活体检测:图片、视频活体检测
- 人脸表情识别:7种表情识别
- 人脸质量评估:亮度评估、清晰度评估、完整度评估、姿态评估、遮挡评估
# 能力展示
人脸检测 - 5点人脸关键点定位 | 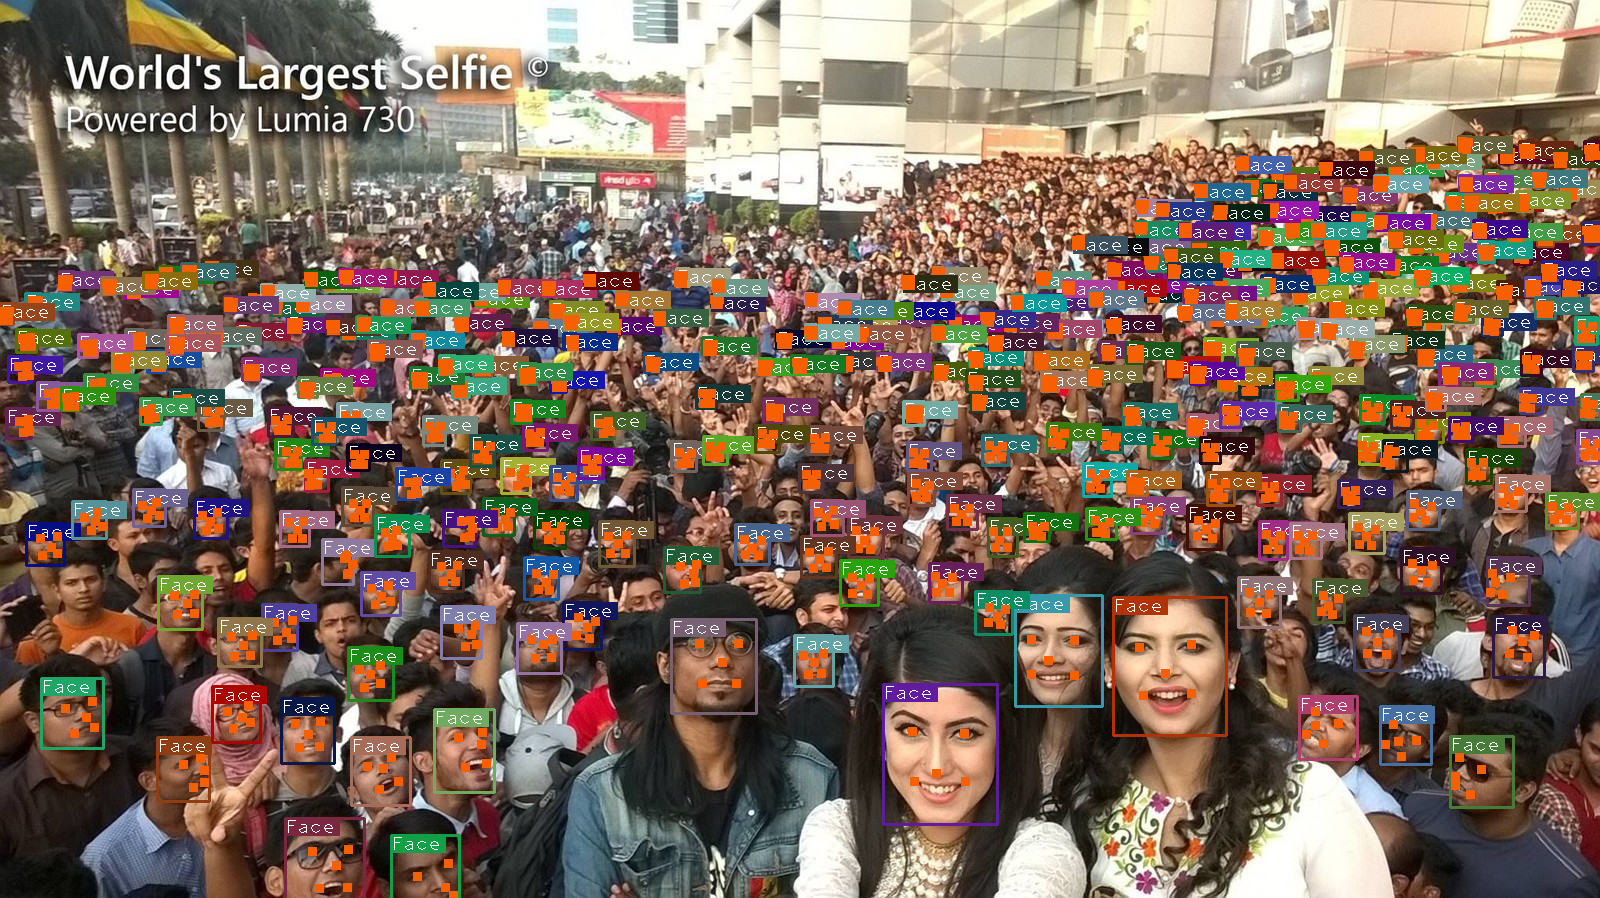 |
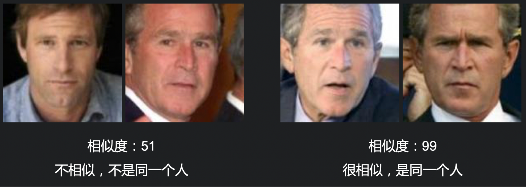
人脸比对1:1 - 人脸对齐 | 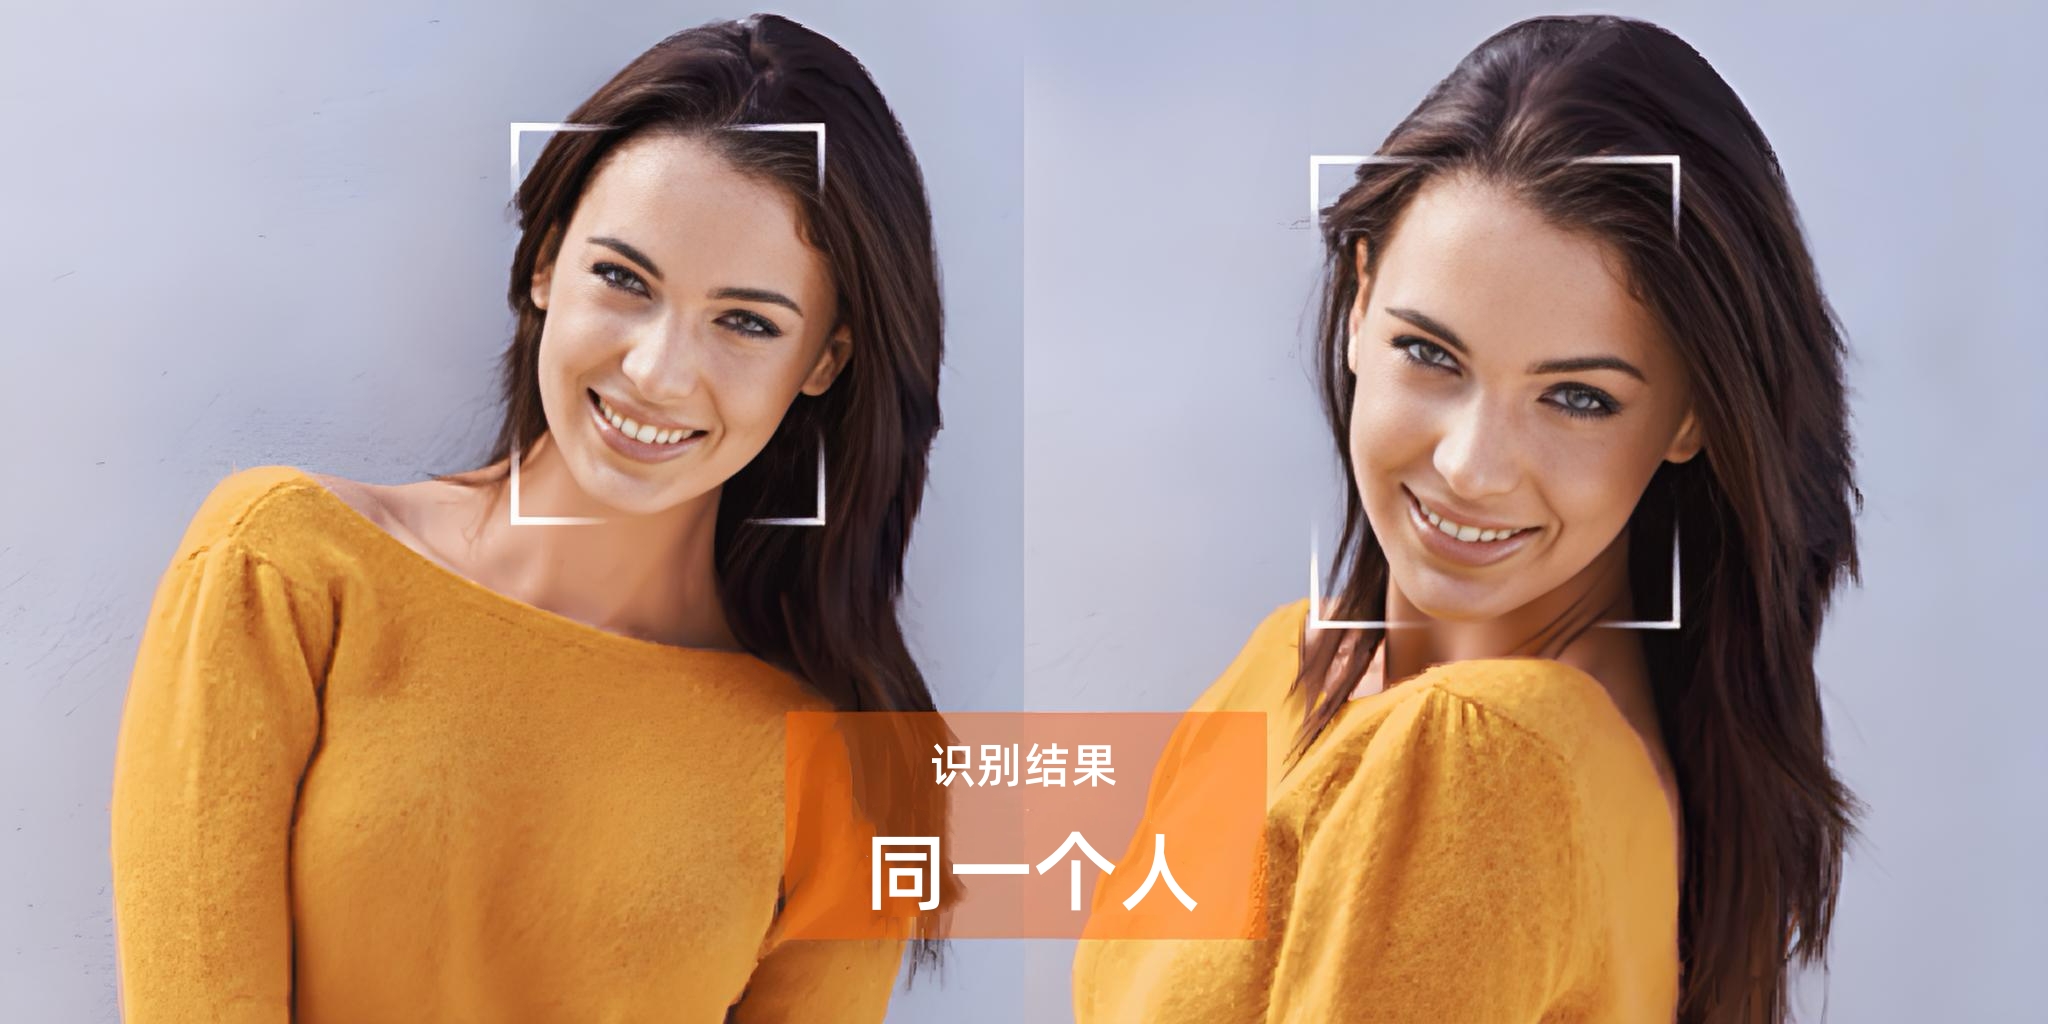 |
人证核验 |  |
人脸比对1:N - 人脸对齐- 人脸注册 - 人脸库查询 - 人脸库删除 | 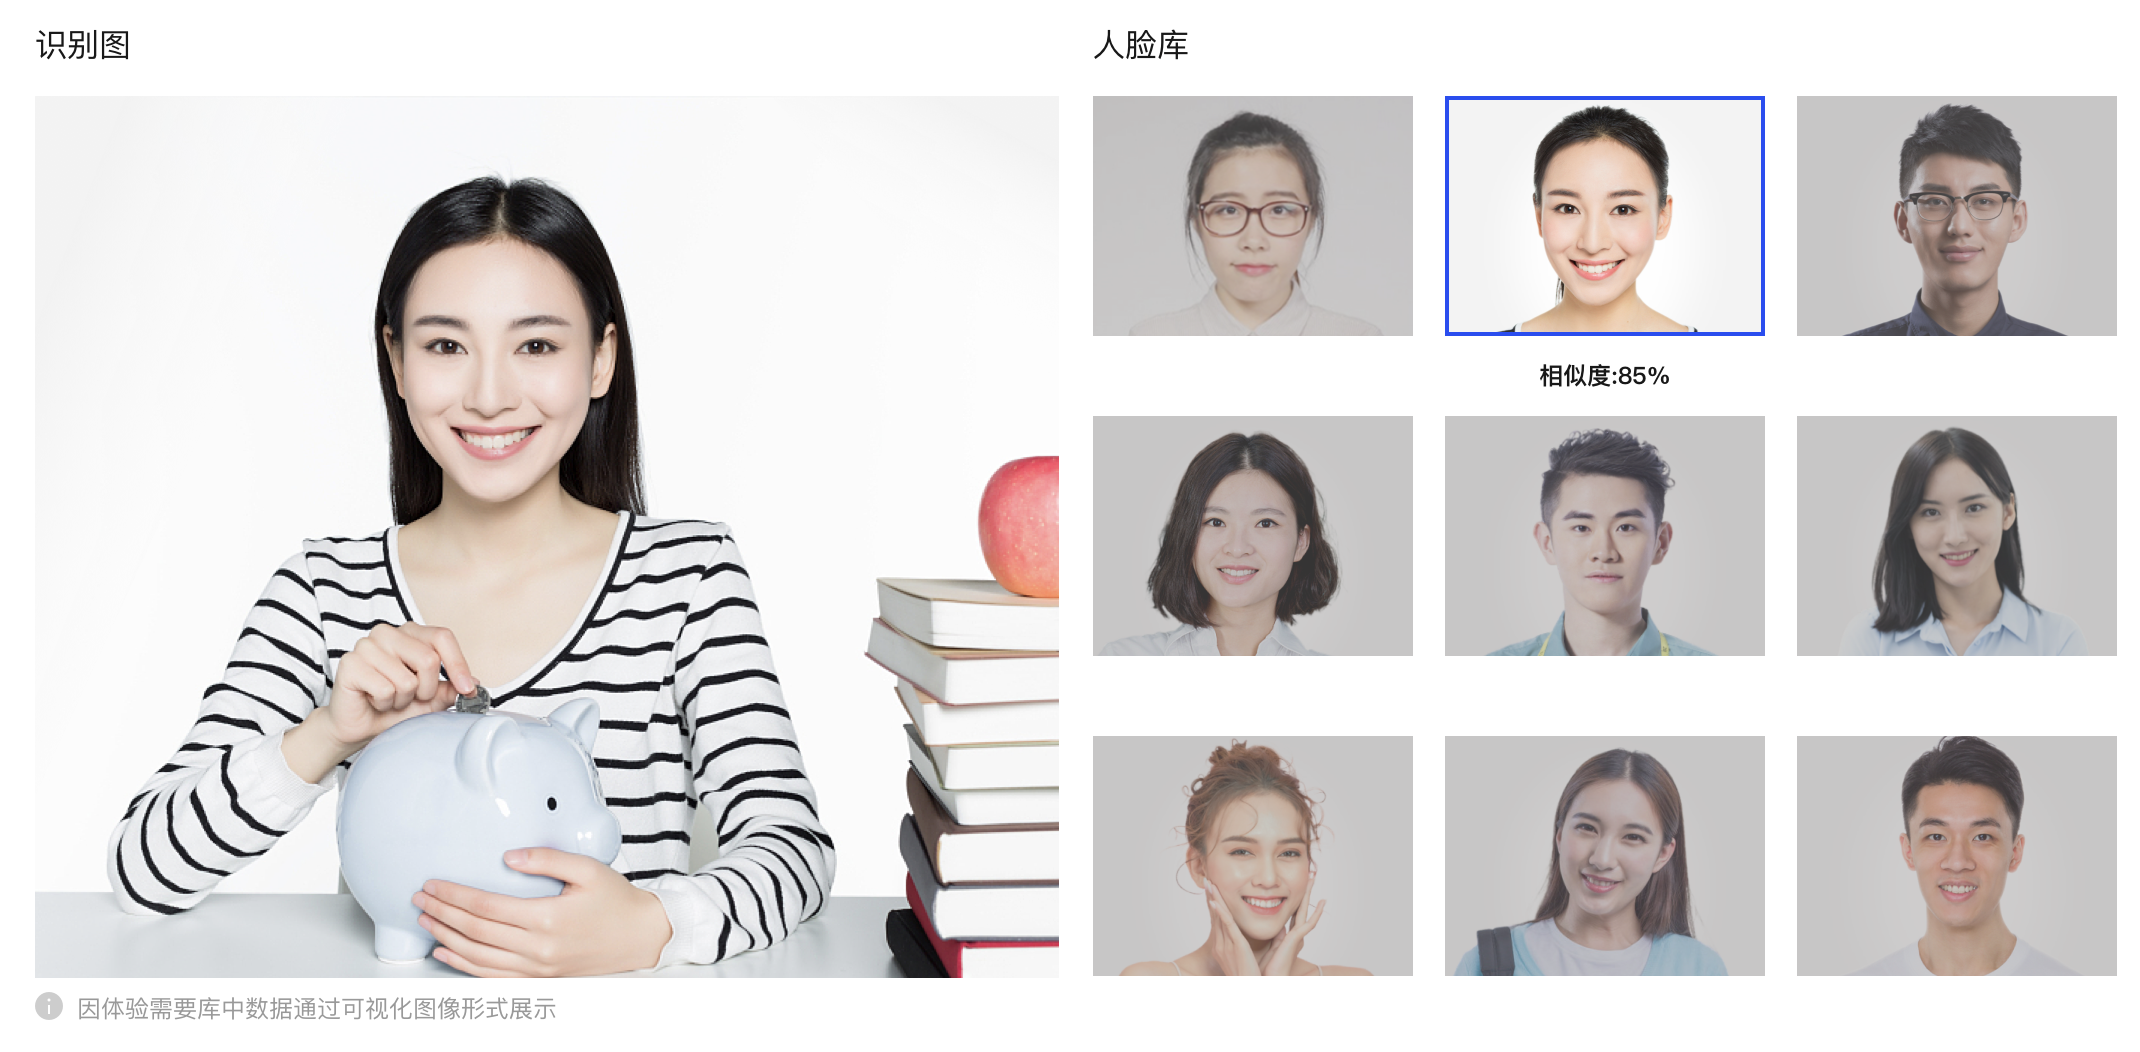 |
人脸属性检测 - 性别检测- 年龄检测 - 口罩检测 - 眼睛状态检测 - 脸部姿态检测 | 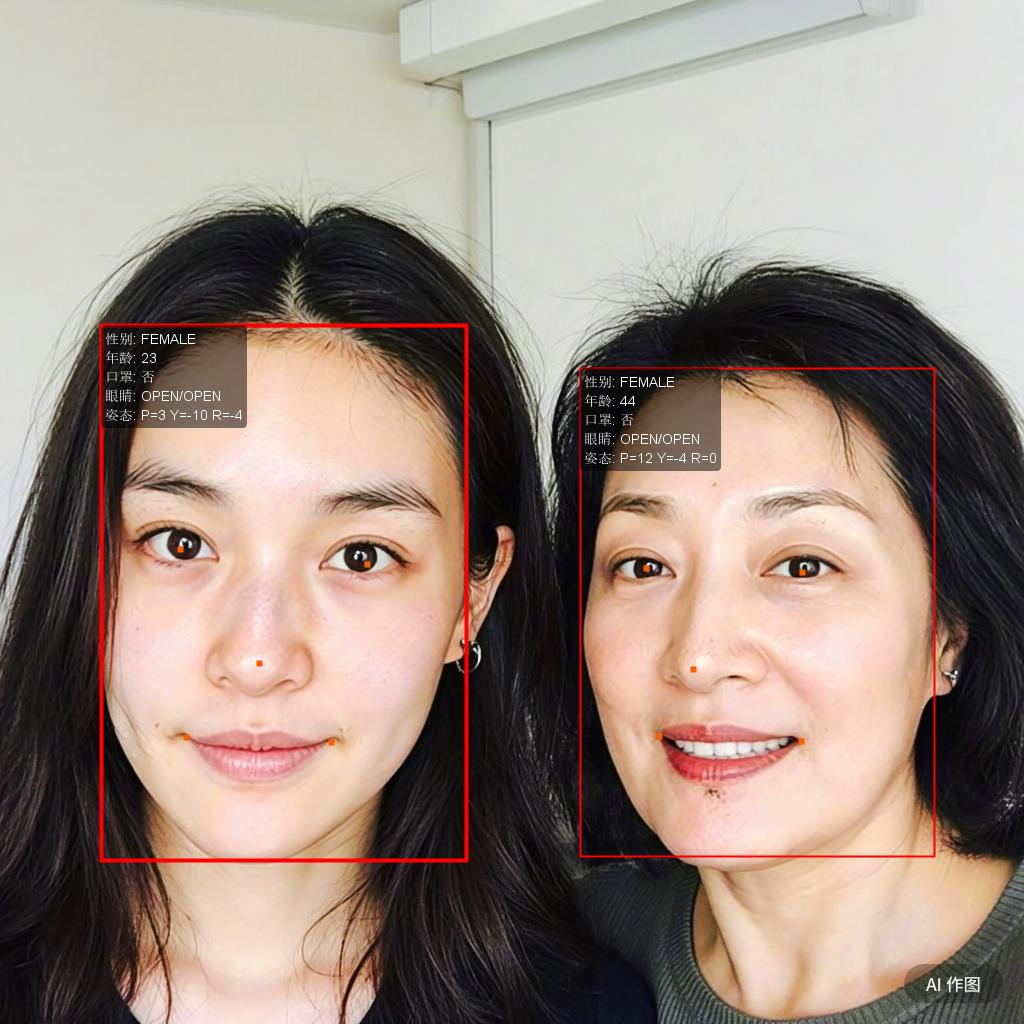 |
活体检测 - 图片和视频活体检测 | 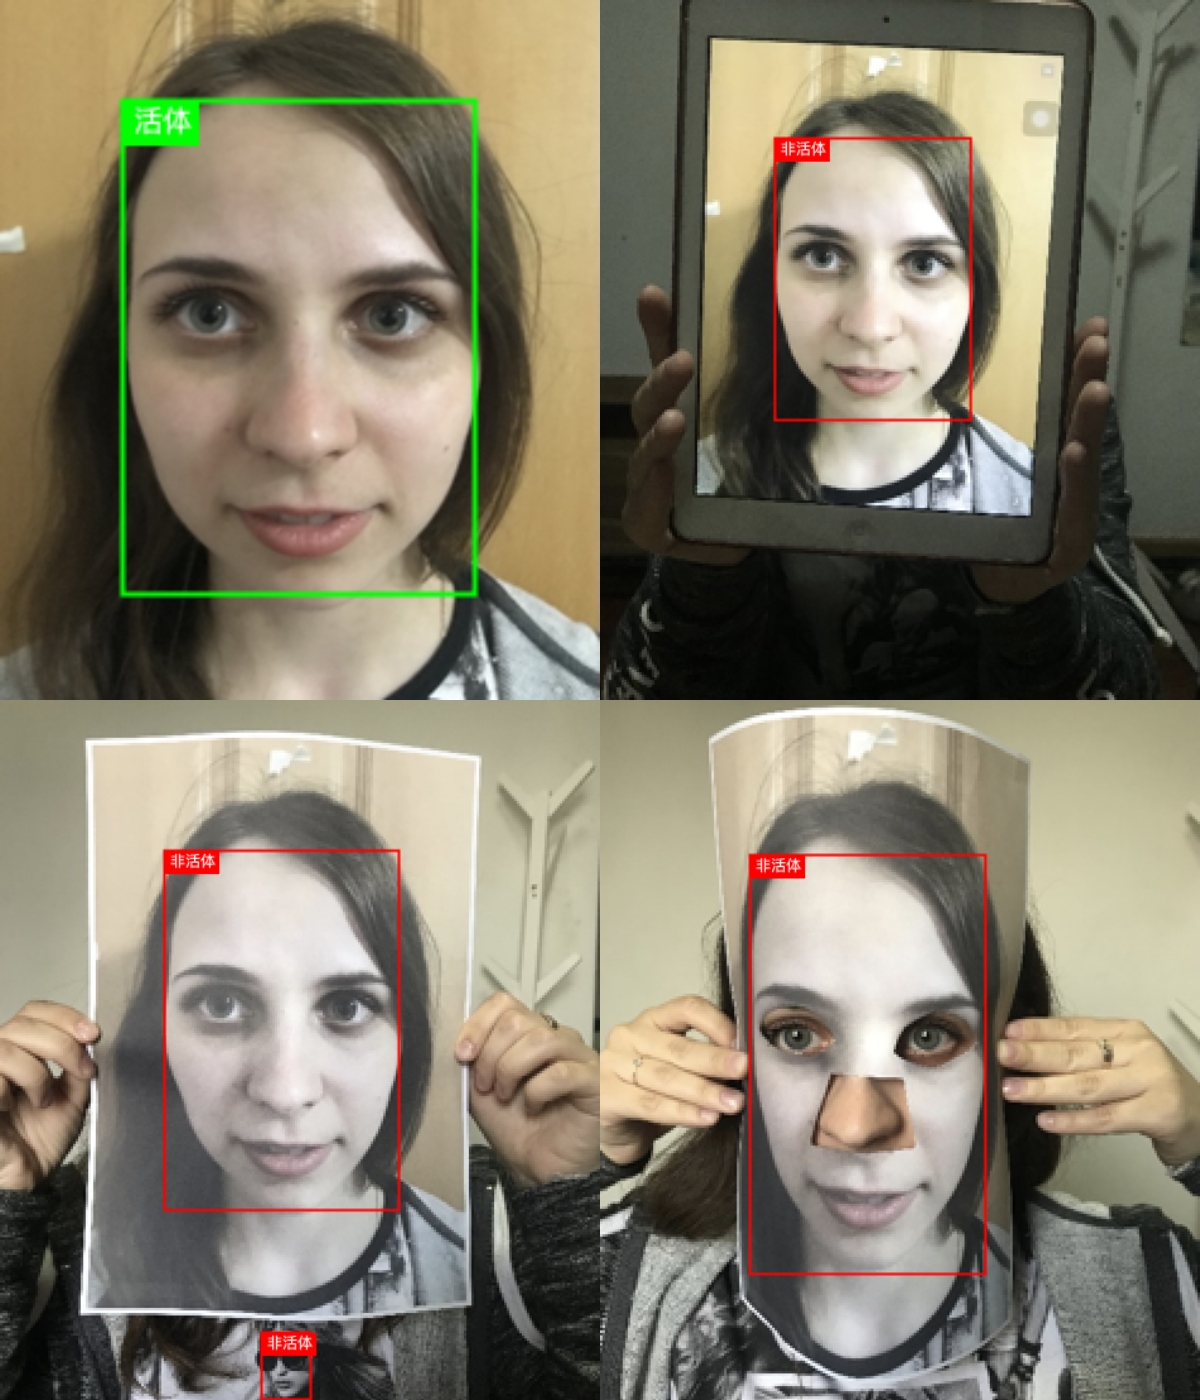 |
人脸表情识别 - 7种表情检测 | 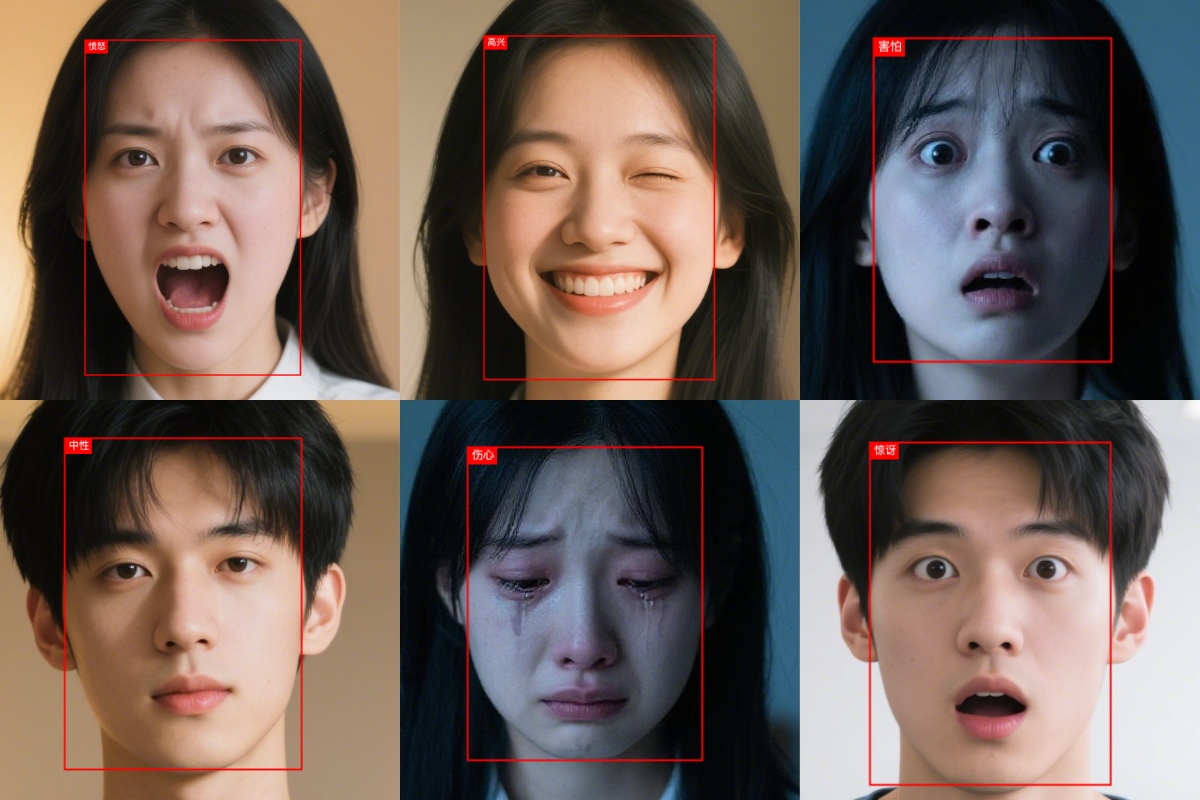 |
# 准备工作
# 1、Maven引入
在项目的 pom.xml 中添加以下依赖,详细引入方式参考 Maven 引入。
如需引入全部功能,请使用 【不推荐 ❌】 all 模块。
<dependency>
    <groupId>cn.smartjavaai</groupId>
    <artifactId>face</artifactId>
    <version>1.1.1</version>
</dependency>
# 2、模型简介及下载
人脸检测模型(FaceDetection、FaceLandmarkExtraction)
支持功能:
- 人脸检测
- 5点人脸关键点定位
| 模型名称 | 引擎 | 准确率 | 平均推理时间(ms) | 模型开源网站 |
|---|---|---|---|---|
| RetinaFace(高精度) | PyTorch | 99% | 1027 | Github (opens new window) |
| 👍RetinaFace_640x640(高精度) | OnnxRuntime | 98% | 311 | Github (opens new window) |
| 👍MTCNN(均衡) | PyTorch | 98% | 261 | Github (opens new window) |
| 👍yolov5face_m_640x640(均衡) | OnnxRuntime | 98% | 238 | 无 |
| 👍SeetaFace6(均衡) | C++ | 98% | 248 | Github (opens new window) |
| RetinaFace_1080x720(均衡) | OnnxRuntime | 96% | 555 | Github (opens new window) |
| yolov5face_n_0.5_320x320(极速) | OnnxRuntime | 73% | 94 | 无 |
| UltraLightFastGenericFace(极速) | PyTorch | 50% | 186 | Github (opens new window) |
测试环境与结果说明:在 Win10 + 16GB 内存 + AMD Ryzen 7 6800H(CPU) 环境下,使用 33 张人脸图片进行测试,以上为准确率与平均推理时间结果。
人脸识别模型(FaceRecognition)
支持功能:
- 人脸512维特征提取
- 人脸对齐(人脸矫正)
- 人脸特征比对(内积[IP]、欧氏距离[L2]、余弦相似度[COSINE])
| 模型名称 | 引擎 | 推荐阈值 | 平均推理时间(ms) | 模型开源网站 |
|---|---|---|---|---|
| 👍ElasticFace(高精度) | PyTorch | 0.61 | 266 | Github (opens new window) |
| 👍evoLVe_ir50_asia(高精度) | PyTorch | 0.62 | 215 | Github (opens new window) |
| 👍SeetaFace6(高精度) | C++ | 0.62 | 132 | Github (opens new window) |
| 👍InsightFace_IR-SE50(高精度) | PyTorch | 0.62 | 197 | Github (opens new window) |
| evoLVe_ir152 | PyTorch | 0.62 | 332 | Github (opens new window) |
| evoLVe_ir50 | PyTorch | 0.62 | 216 | Github (opens new window) |
| VGGFace2 | PyTorch | 0.75 | 181 | Github (opens new window) |
| FaceNet | PyTorch | 0.7 | 120 | Github (opens new window) |
| SphereFace_20A_ONNX | OnnxRuntime | 0.7 | 277 | Github (opens new window) |
| SphereFace_20A_PT | PyTorch | 0.7 | 186 | Github (opens new window) |
| DREAM_IJBA_RES18_NAIVE | PyTorch | 0.74 | 431 | Github (opens new window) |
| InsightFace_Mobilefacenet(轻量) | PyTorch | 0.64 | 105 | Github (opens new window) |
| SeetaFace6_light(轻量) | C++ | 0.62 | 111 | Github (opens new window) |
测试环境与结果说明:在 Win10 + 16GB 内存 + Intel Core i5 8400 环境下,使用 100对样本(50对正样本,50对负样本,没对两张图片) 进行测试,平均推理时间(推理时间为一次人脸比对:包含人脸检测与人脸对齐)。
📌 实际使用中建议根据业务容错性、识别场景(如门禁、人脸检索)灵活设置阈值。
静态活体检测(RGB)模型(Silent face-anti-spoofing、FaceLivenessDetection)
支持功能:
- 检测图片中的人脸是否为来自认证设备端的近距离裸拍活体人脸对象(裸拍活体正面人脸是指真人未经重度PS、风格化、人工合成等后处理的含正面人脸)
| 模型名称 | 模型简介 | 模型开源网站 |
|---|---|---|
| MiniVision | 小视科技的静默活体检测 | Github (opens new window) |
| IIC_FL(cv_manual_face-liveness_flrgb) | 阿里通义工作室人脸活体检测模型-RGB | 魔塔 (opens new window) |
| SeetaFace6 | 中科视拓最新开放的开源免费的全栈人脸识别工具包 | Github (opens new window) |
人脸表情识别模型(FacialExpressionRecognition、fer)
支持功能:
- 支持识别7种表情:neutral(中性)、happy(高兴)、sad(悲伤)、surprise(惊讶)、fear(恐惧)、disgust(厌恶)、anger(愤怒)
| 模型名称 | 模型简介 | 模型开源网站 |
|---|---|---|
| DensNet121 | FaceLib的densnet121表情识别模型 | Github (opens new window) |
| FrEmotion | FaceRecognition-LivenessDetection-Javascript | Github (opens new window) |
人脸属性识别模型(GenderDetection、AgeDetection、EyeClosenessDetection、FacePoseEstimation)
支持功能:
- 性别检测
- 年龄检测
- 闭眼检测
- 人脸姿态检测
- 戴口罩检测
| 模型名称 | 模型简介 | 模型开源网站 |
|---|---|---|
| SeetaFace6 | 中科视拓最新开放的开源免费的全栈人脸识别工具包 | Github (opens new window) |
人脸质量评估模型(FaceQualityAssessment)
支持功能:
- 亮度评估
- 清晰度评估
- 完整度评估
- 姿态评估
- 遮挡评估
| 模型名称 | 模型简介 | 模型开源网站 |
|---|---|---|
| SeetaFace6 | 中科视拓最新开放的开源免费的全栈人脸识别工具包 | Github (opens new window) |
# 3、返回结果说明:R<T>
R<T> 是一个统一的返回结果封装类(Response Wrapper),用于标准化接口返回结构,便于前端或调用方统一处理。
包含以下字段:
| 字段名 | 类型 | 说明 |
|---|---|---|
code | Integer | 状态码,通常 0 表示成功,非 0 表示失败 |
message | String | 提示信息,例如 "ok"、"image not found" |
data | T | 实际返回的数据内容 |
# 人脸检测
人脸检测(Face Detection),就是给定一幅图像,找出图像中的人脸位置,通常用一个矩形框框起来
Image类说明:
所有接口中我们使用了一个Image类,用来表示图像,具体使用请查看Image类
# 获取模型
FaceDetConfig config = new FaceDetConfig();
config.setModelEnum(FaceModelEnum.MTCNN);//人脸检测模型
config.setModelPath("/Users/xxx/Documents/develop/model/mtcnn");
config.setConfidenceThreshold(0.5);//置信度阈值
config.setNmsThresh(FaceDetectConstant.NMS_THRESHOLD);//非极大抑制阈值
FaceDetModel faceDetModel = FaceDetModelFactory.getInstance().getModel(config);
# FaceDetConfig参数说明
| 字段名称 | 字段类型 | 默认值 | 说明 |
|---|---|---|---|
| modelEnum | FaceDetModelEnum | NULL | 人脸模型枚举 |
| modelPath | String | NULL | 手动指定离线模型路径 |
| device | DeviceEnum | 自动判断 | 指定运行设备,支持 CPU/GPU |
| confidenceThreshold | double | 无 | 置信度阈值,只返回相似度大于该值的人脸,需要根据实际情况调整,分值越大越严格容易漏检,分值越小越宽松容易误识别 |
| nmsThresh | double | 0.45 | 非极大抑制阈值,用于去除重复的人脸框,当两个框的重叠度超过该值时,只保留一个,建议使用默认值 |
| customParams | Map<String, Object> | 无 | 个性化配置(按模型类型动态解析) |
人脸检测阈值参考:
- 低阈值(≈0.3–0.5):几乎所有可能的人脸都会检测出来,但误检多,适合需要尽量“不漏检”的场景(如人脸抓拍大盘点)。
- 中阈值(≈0.5–0.8):适合常规业务场景(如门禁考勤、人脸聚合)。
- 高阈值(≈0.8–0.9):保证检测结果较为可靠,减少误检,适合安全要求高的场景(如金融风控、实名制核验)。
- 极高阈值(≈0.95+):几乎只保留非常确定的人脸,误检率极低,但容易漏检,适合极端高安全需求(如证件照比对、反欺诈)。
# 人脸检测方法
//推荐使用
R<DetectionResponse> detect(Image image);
//以下接口将在后续版本中移除
R<DetectionResponse> detect(String imagePath);
R<DetectionResponse> detect(BufferedImage image);
R<DetectionResponse> detect(byte[] imageData);
R<DetectionResponse> detect(InputStream imageInputStream)
R<DetectionResponse> detectBase64(String base64Image);
# DetectionResponse字段说明
- 返回并非json格式,仅用于字段讲解
{
  "detectionInfoList": [ // 检测信息列表
    {
      "detectionRectangle": { //矩形框
        "height": 174, // 矩形高度
        "width": 147, // 矩形宽度
        "x": 275, // 左上角横坐标
        "y": 143 // 左上角纵坐标
      },
      "faceInfo": { // 人脸信息
        "keyPoints": [ // 5个人脸关键点:循序依次为,左眼中心、右眼中心、鼻尖、左嘴角和右嘴角
          {
            "x": 339.5083751678467,
            "y": 192.76402664184573
          },
          {
            "x": 404.7374267578125,
            "y": 197.89914321899414
          },
          {
            "x": 388.9555263519287,
            "y": 231.50675201416016
          },
          {
            "x": 339.8661708831787,
            "y": 265.51241302490234
          },
          {
            "x": 397.7071800231933,
            "y": 269.7657699584961
          }
        ]
      },
      "score": 0.9995993 // 置信度分值
    }
  ]
}
# 检测并绘制人脸框
绘制人脸区域及5个人脸关键点:左眼中心、右眼中心、鼻尖、左嘴角和右嘴角
//推荐使用
default R<DetectionResponse> detectAndDraw(Image image);
//以下接口将在后续版本中移除
R<Void> detectAndDraw(String imagePath, String outputPath);
R<BufferedImage> detectAndDraw(BufferedImage sourceImage);
DetectionResponse中包含绘制后的图片信息:Image drawnImage
# 裁剪人脸
FaceUtils.cropFace 方法说明:
cropFace 用于根据检测到的人脸区域,从原始图像中裁剪出对应的人脸图像。
public static Image cropFace(Image image, DetectionRectangle rectangle)
人脸检测最佳实践:
提高检测速度的优化建议:
1、查看模型列表,优先选择高速、轻量级模型。
2、使用 GPU(高性能显卡)加速推理计算。
# 人脸识别
人脸识别就是将两张人脸的特征信息进行比对,给出一对人脸图像的相似度,从而判断两张人脸是否是同一个人,若相似度高于阈值则认为是同一个人,否则为不同的人。
人脸识别的类型:
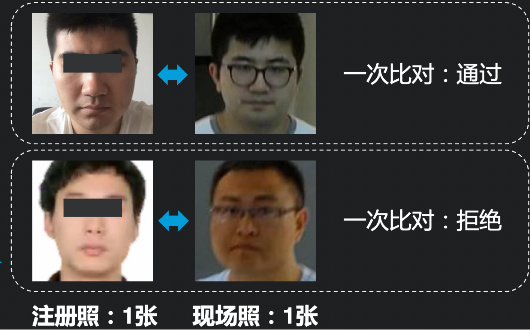
- 人脸验证——1:1人脸识别
通过提取两张人脸的特征进行相似度对比,最终返回相应的置信度得分,根据特征匹配程度决定“拒绝”或者“接受”。用于判断两个输入人脸是否属于同一人,适用于身份识别及相似脸查询等应用查询
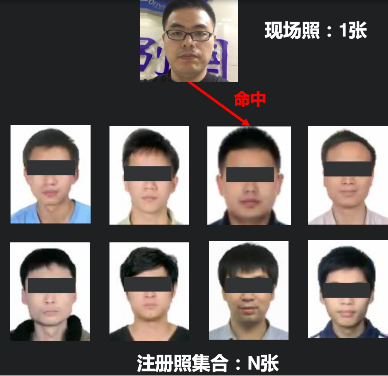
- 人脸检索——1:N人脸识别
在大规模人脸数据库中找出与待检索人脸相似度最高的一个或多个人脸。通过创建的待查人员的面部特征,可以在人脸数据库中迅速查找,可用于身份确认以及身份查询等应用场景
# 人脸识别流程

可分为以下四个步骤:
获取图像数据:利用摄像头获取要检测的图像
人脸检测:检测出图片中要识别的一个或多个人脸,获取人脸区域和坐标位置
人脸对齐(校正): 根据人脸关键点检测的结果,将不同姿态的人脸转换为相对正脸
人脸识别:在已准备的数据库中,匹配一个或多个人脸,完成人脸识别
注意:人脸识别和人脸检测并非同一技术。人脸检测是人脸识别完整流程中的一个环节。在用摄像头采集含有人脸的图像或视频流后,首先就需要用人脸检测技术自动检测、提取当中的人脸,随后才能进入人脸图像预处理及最核心的人脸特征提取环节,在这一部分主要给大家介绍人脸识别任务。
# 人脸特征提取
提取人脸512维特征值,用于后续人脸识别
# 获取人脸识别模型
FaceRecConfig config = new FaceRecConfig();
config.setModelEnum(FaceModelEnum.FACENET_MODEL);//人脸识别模型
config.setCropFace(true);
config.setAlign(true);
config.setDetectModel(getFaceDetModel());
FaceRecModel faceRecModel = FaceRecModelFactory.getInstance().getModel(config);
Image类说明:
所有接口中我们使用了一个Image类,用来表示图像,具体使用请查看Image类
# FaceRecConfig参数说明
| 字段名称 | 字段类型 | 默认值 | 说明 |
|---|---|---|---|
| modelEnum | FaceDetModelEnum | RETINA_FACE | 人脸模型枚举 |
| modelPath | String | NULL | 手动指定离线模型路径 |
| device | DeviceEnum | CPU | 指定运行设备,支持 CPU/GPU |
| isAutoLoadFace | boolean | true | 是否自动加载人脸到内存 |
| cropFace | boolean | true | 是否对输入图片中的人脸进行裁剪。推荐对原始图像开启此项,以提取更精确的特征。若图像已是标准人脸区域,可关闭以提升效率。 |
| align | boolean | false | 是否进行人脸对齐。仅在 cropFace = true 时生效。若人脸角度较正,建议关闭可提升性能;若角度偏差大,建议开启提高准确性。 |
| detectModel | FaceDetModel | 无 | 人脸检测模型配置,可自定义所用的检测模型。 |
| vectorDBConfig | VectorDBConfig | 无 | 向量数据库配置 |
| customParams | Map<String, Object> | 无 | 个性化配置(按模型类型动态解析) |
注意事项:
1、如果输入的图片未经过人脸矫正,则请务必设置 align = true,否则特征提取结果可能不准确。
2、如果图片未经过人脸裁剪,则请务必设置 cropFace = true,否则特征提取结果可能不准确。
# 人脸特征提取(多人脸场景)
下面的方法将提取图片中所有人脸特征
//推荐使用
R<DetectionResponse> extractFeatures(Image image);
//以下接口将在后续版本中移除
R<DetectionResponse> extractFeatures(String imagePath);
R<DetectionResponse> extractFeatures(BufferedImage sourceImage);
R<DetectionResponse> extractFeatures(byte[] imageData);
DetectionResponse转为json格式,如下所示:
{
    "detectionInfoList": [
        {
            "detectionRectangle": {
                "height": 328,
                "width": 307,
                "x": 157,
                "y": 288
            },
            "faceInfo": {
                "feature": [ // 人脸特征向量:不同模型返回的特征向量数量不同,可能是 512 或 1024。
                   //此处内容较多,省略
                ],
                "keyPoints": [
                    {
                        "x": 248.22177505493164,
                        "y": 384.6785583496094
                    },
                    {
                        "x": 374.57435607910156,
                        "y": 374.8636550903321
                    },
                    {
                        "x": 322.0528106689453,
                        "y": 442.43547058105474
                    },
                    {
                        "x": 267.237491607666,
                        "y": 514.3596992492676
                    },
                    {
                        "x": 380.99170684814453,
                        "y": 506.0889015197754
                    }
                ]
            },
            "score": 0.99999225
        }
    ]
}
# 人脸特征提取(单人脸场景)
提取图像中分数最高的人脸特征,适用于仅包含单张人脸的图像,或存在主次明显的人脸场景。
//推荐使用
R<float[]> extractTopFaceFeature(Image image);
//以下接口将在后续版本中移除
R<float[]> extractTopFaceFeature(String imagePath);
R<float[]> extractTopFaceFeature(BufferedImage sourceImage);
R<float[]> extractTopFaceFeature(byte[] imageData);
# 人脸比对(相似度计算)
- 参数为extractFeatures或extractTopFaceFeature的返回结果
/**
 * 计算相似度
 * @param feature1 图1特征
 * @param feature2 图2特征
 * @return
 */
float calculSimilar(float[] feature1, float[] feature2);
不同模型的相似度阈值不同,请参考模型列表中提供的推荐阈值。
# 人脸比对(1:1)
直接对两张图片进行比对。方法内部会自动提取每张图中分数最高的人脸特征,并进行相似度计算。
等价于先调用 extractTopFaceFeature 方法提取人脸特征,再使用 calculateSimilar 方法进行比对。
//推荐使用
float featureComparison(Image image);
//以下接口将在后续版本中移除
float featureComparison(String imagePath1, String imagePath2);
float featureComparison(BufferedImage sourceImage1, BufferedImage sourceImag2);
float featureComparison(byte[] imageData1, byte[] imageData2);
人脸识别优化建议:
不同模型的相似度阈值不同,请参考模型列表中提供的推荐阈值。
阈值调整与识别准确度权衡
阈值高:误识别率低,但可能漏识;
阈值低:识别率高,但误识别增加。
这导致调节阈值时很难两全,出现“怎么调都不理想”的尴尬情况。
- 人脸对齐的重要性
在特征提取前进行人脸对齐处理(如五官定位后仿射变换),可显著减少因角度、姿态等带来的干扰,使同一人的人脸特征在特征空间中更集中,从而:
降低阈值敏感性,提高识别稳定性;
SmartJavaAI 在特征提取前集成人脸对齐步骤,推荐在实际部署中启用。
- 底库质量
光靠调节阈值已不够,需回到人脸识别系统的关键——底库质量。
底库质量直接影响识别效果,需满足两个关键维度:
图像质量高:正面照、自然光、无遮挡、清晰无噪声,人脸部分建议≥128×128 像素;
成像环境一致:底库图片应尽量在与识别场景相同的摄像头/环境下采集(现场注册)。
现场注册同时满足图像质量和成像一致性,能显著提升实际识别表现。
- 避免影响识别的常见问题
(1)不要对人脸照片进行 PS、美图等失真处理;
(2)尽量避免浓妆,妆容会干扰特征提取;
(3)要保证底库照片与现场照片具备最基本的可辨识性。
简言之:人眼都难识别的,别强求算法能识别。
- 质量控制的双向性
上述底库要求同样适用于现场照片。特征比对是对称的,质量差的一方都会影响最终效果。
- 质量评估机制
借助 SmartJavaAI 提供的质量评估模块,可自动筛除不符合要求的低质量图片,从而显著提升识别效果与稳定性。质量评估
# 人脸库
人脸库相关功能(如人脸注册、人脸查询、人脸删除、清空人脸库等)都依赖于人脸库的支持。 SmartJavaAI 当前支持两种人脸库方案,分别适用于不同规模与性能需求的应用场景:
| 人脸库方案 | 应用场景说明 |
|---|---|
| SQLite + 内存轮询 | 适用于人脸数量 少于 1 万 的轻量级应用场景。 人脸特征与元信息保存在 SQLite 中,查询时将人脸特征加载至内存进行逐个比对。 部署简单、程序将自动创建 SQLite 数据库及相关数据表,无需用户手动配置。 缺点是查询性能有限,随着人脸数量增多,查询耗时显著增加。 |
| Milvus 向量数据库 | 适用于人脸数量 大于 1 万 的中大型项目或高性能场景。 Milvus 是一款高性能、专为向量检索设计的开源数据库,支持百万级甚至亿级人脸特征的高效检索。 使用前需要单独部署 Milvus 服务,详细安装及配置请参考 Milvus 官网 (opens new window)。 |
# 如何选择?
如果你的人脸数据量较少、无需高并发查询,推荐使用 SQLite + 内存轮询 模式,部署简单,无需额外依赖。
如果你有较高的性能要求或数据规模较大(例如人脸库规模达数十万甚至百万级),推荐使用 Milvus 向量数据库,实现毫秒级检索能力。
# 人脸库配置
SmartJavaAI 支持两种人脸库方案:Milvus 和 SQLite。无论使用哪种方案,均需配置对应的人脸库参数。
MilvusConfig 和 SQLiteConfig 都继承自统一的父类:VectorDBConfig,在模型初始化阶段统一通过 FaceModelConfig 进行设置。
Milvus 配置说明
MilvusConfig 的所有字段都有默认值,但如果不显式创建该对象,SmartJavaAI 会默认认为不使用 Milvus,因此不会初始化向量库。
创建MilvusConfig示例:
MilvusConfig vectorDBConfig = new MilvusConfig();
vectorDBConfig.setHost("127.0.0.1");
vectorDBConfig.setPort(19530);
//vectorDBConfig.setUsername("root");
//vectorDBConfig.setPassword("Milvus");
vectorDBConfig.setIdStrategy(IdStrategy.AUTO);
vectorDBConfig.setMetricType(MetricType.IP);
faceModelConfig.setVectorDBConfig(vectorDBConfig);
MilvusConfig字段说明
| 字段名称 | 字段类型 | 默认值 | 说明 |
|---|---|---|---|
| host | String | localhost | Milvus服务地址 |
| port | int | 19530 | Milvus服务端口 |
| username | String | null | Milvus用户名 |
| password | String | null | Milvus密码 |
| collectionName | String | face | Milvus数据集合名称 |
| idStrategy | IdStrategy | AUTO | ID 生成策略,支持自动或自定义 |
| metricType | MetricType | 相似度计算方式,不同模型有默认策略(如 IP / COSINE) | |
| dimension | int | 特征向量维度 ,不同模型有不同的默认维度 | |
| type | VectorDBType | 向量数据库类型,父类VectorDBConfig字段 | |
| useMemoryCache | boolean | true | 是否使用内存缓存 |
| nlist | int | 1024 | IVF 索引的聚类数,影响搜索性能 ,具体请参考Milvus官方文档了解 |
| indexType | IndexType | IndexType.IVF_FLAT | Milvus索引类型,具体请参考Milvus官方文档了解 |
IdStrategy枚举说明
| 枚举值 | 说明 |
|---|---|
| AUTO | 自动生成ID(默认) |
| CUSTOM | 用户自定义 ID(注册时由FaceRegisterInfo中id 指定) |
MetricType枚举说明:(来自 Milvus SDK)
| 枚举值 | 说明 |
|---|---|
| None | 无需指定 |
| L2 | 欧氏距离 |
| IP | 内积 |
| COSINE | 余弦相似度 |
其他枚举值较少使用,可参考 Milvus 官方文档 了解。
VectorDBType枚举说明
| 枚举值 | 说明 |
|---|---|
| SQLITE | Sqlite,非专用向量库的备用方案 |
| MILVUS | Milvus向量数据库 |
注意事项:
1、相似度计算方式:MetricType 影响相似度结果,不建议随意更改。
(1)FaceNet 默认使用 内积(IP)。
(2)SeetaFace6 默认使用 余弦相似度(COSINE)。
2、向量维度(dimension):不建议用户手动修改,应使用模型默认值,否则可能导致搜索失败或精度下降。
3、无需手动设置类型字段(type),SmartJavaAI 会根据传入的配置对象类型(MilvusConfig 或 SQLiteConfig)自动判断所使用的人脸库类型。
SQLite数据库配置如下:
SQLiteConfig 的所有字段都有默认值,但如果不显式创建该对象,SmartJavaAI 会默认认为不使用 SQLite,因此不会初始化数据库。
创建SQLiteConfig示例:
SQLiteConfig vectorDBConfig = new SQLiteConfig();
vectorDBConfig.setDbPath("/Users/wenjie/Downloads/face.db");
vectorDBConfig.setSimilarityType(SimilarityType.IP);
config.setVectorDBConfig(vectorDBConfig);
SQLiteConfig字段说明
| 字段名称 | 字段类型 | 默认值 | 说明 |
|---|---|---|---|
| dbPath | String | 数据库路径(包含文件名称) | |
| similarityType | SimilarityType | 相似度计算方式 | |
| type | VectorDBType | 向量数据库类型,父类VectorDBConfig字段 |
SimilarityType枚举说明:
| 枚举值 | 说明 |
|---|---|
| L2 | 欧氏距离 |
| IP | 内积 |
| COSINE | 余弦相似度 |
注意事项:
1、相似度计算方式:SimilarityType 影响相似度结果,不建议随意更改。
(1)FaceNet 默认使用 内积(IP)。
(2)SeetaFace6 默认使用 余弦相似度(COSINE)。
2、SQLite数据库路径(dbPath),默认使用 SmartJavaAI 的缓存目录,文件名为 face.db,缓存路径可参考:缓存使用。
如需自定义数据库路径,可通过如下方式手动设置:
vectorDBConfig.setDbPath("/Users/xxx/Downloads/face.db");
无需手动创建 face.db 文件,SmartJavaAI 会在首次使用时自动创建数据库并初始化所需表结构。
# 人脸库初始化
当FaceModelConfig中的 isAutoLoadFace = true(默认值)时,系统会在模型创建时异步加载人脸库数据到内存。
你可以通过 faceRecModel.isLoadFaceCompleted() 方法判断加载是否完成,仅在加载完成后才能调用人脸库相关功能。
如果希望手动控制加载时机,也可以将 isAutoLoadFace 设置为 false,然后通过显式调用 loadFaceFeatures() 方法将人脸库数据加载到内存。
当然也可以调用 releaseFaceFeatures() 方法来释放内存
⚠️ 注意事项:
- SQLite 模式:必须加载至内存后,才能使用注册、查询等人脸库相关功能。
- Milvus 模式:是否加载数据到内存,并不会影响人脸库相关功能的使用。
# 人脸注册
支持通过图片直接完成注册,内部流程为:人脸检测 → 提取分数最高人脸特征 → 注册到人脸库。
//推荐使用
R<String> register(FaceRegisterInfo faceRegisterInfo, Image image);
//以下接口将在后续版本中移除
R<String> register(FaceRegisterInfo faceRegisterInfo, String imagePath);
R<String> register(FaceRegisterInfo faceRegisterInfo, BufferedImage sourceImage);
R<String> register(FaceRegisterInfo faceRegisterInfo, byte[] imageData);
也支持使用已提取的人脸特征进行注册:
R<String> register(FaceRegisterInfo faceRegisterInfo, float[] feature);
FaceRegisterInfo字段说明
| 字段名称 | 字段类型 | 默认值 | 说明 |
|---|---|---|---|
| id | String | null | 唯一标识 |
| metadata | String | null | 人脸元数据 |
# 人脸注册 ID 策略说明
Milvus 模式:
- 当
IdStrategy = AUTO(默认)时,无需手动设置 ID,系统将自动生成唯一的随机 ID,并返回给用户。 - 当
IdStrategy = CUSTOM时,用户必须手动指定 ID,且需确保 ID 在人脸库中全局唯一(支持数字或字符串格式)。
- 当
SQLite 模式:
- 若用户未设置 ID,系统将自动生成随机 ID 并返回。
- 若用户手动设置了 ID,系统将使用该 ID 作为唯一标识。
metadata 建议:
建议将
metadata字段设置为 JSON 格式的字符串,以便后续扩展或按需解析,例如:{ "name": "张三", "group": "员工", "remark": "门禁系统白名单" }
# 人脸更新
支持通过图片直接完成更新,内部流程为:人脸检测 → 提取分数最高人脸特征 → 更新人脸库。
//推荐使用
void upsertFace(FaceRegisterInfo faceRegisterInfo, Image image);
//以下接口将在后续版本中移除
void upsertFace(FaceRegisterInfo faceRegisterInfo, String imagePath);
void upsertFace(FaceRegisterInfo faceRegisterInfo, BufferedImage sourceImage);
void upsertFace(FaceRegisterInfo faceRegisterInfo, byte[] imageData);
也支持使用已提取的人脸特征进行更新:
void upsertFace(FaceRegisterInfo faceRegisterInfo, float[] feature);
FaceRegisterInfo可以查看人脸注册中的字段说明
注意事项:
更新人脸时,FaceRegisterInfo 中的 id 不能为空,系统将根据该 id 查找已注册的人脸数据:
若该 id 已存在,则执行更新操作;
若该 id 不存在,则视为新注册,执行人脸注册流程。
⚠️ 请确保使用的 id 对应的人脸数据已注册,否则将不会进行更新,而是新增注册。
# 人脸查询(1:N)
# 多人脸场景
当图片中存在多个人脸,需要同时查询图片中所有人脸,可以使用如下API: 支持通过图片直接完成查询,内部流程为:人脸检测 → 提取分数最高人脸特征 → 查询人脸库。
//推荐使用
R<DetectionResponse> search(Image image, FaceSearchParams params);
//以下接口将在后续版本中移除
R<DetectionResponse> search(String imagePath, FaceSearchParams params);
R<DetectionResponse> search(BufferedImage sourceImage, FaceSearchParams params);
R<DetectionResponse> search(byte[] imageData, FaceSearchParams params);
FaceSearchParams字段说明:
| 字段名称 | 字段类型 | 默认值 | 说明 |
|---|---|---|---|
| topK | Integer | 1 | 搜索结果数量 |
| threshold | Float | null | 搜索阈值 |
| normalizeSimilarity | Boolean | null | 是否对查询结果进行归一化 |
DetectionResponse字段说明
- 返回并非json格式,仅用于字段讲解
{
   "code": 0,
   "data": {
      "detectionInfoList": [
         {
            "detectionRectangle": {
               "height": 290,
               "width": 272,
               "x": 299,
               "y": 430
            },
            "faceInfo": {
               "faceSearchResults": [ //查询结果
                  {
                     "id": "458520100632533898", //人脸ID
                     "metadata": "{\"name\":\"kana\",\"age\":\"25\"}", //人脸元数据
                     "similarity": 0.9391172 //人脸相似度
                  }
               ],
               "feature": [

               ],
               "keyPoints": [
                  {
                     "x": 398.610408782959,
                     "y": 522.2400588989259
                  },
                  {
                     "x": 504.46060943603516,
                     "y": 519.7643661499025
                  },
                  {
                     "x": 472.5443382263184,
                     "y": 579.8505973815918
                  },
                  {
                     "x": 412.2943332195282,
                     "y": 640.1959800720215
                  },
                  {
                     "x": 503.771484375,
                     "y": 633.2885837554933
                  }
               ]
            },
            "score": 0.9999331
         }
      ]
   },
   "message": "成功",
   "success": true
}
# 获取人脸信息
使用ID获取人脸信息
R<FaceVector> getFaceInfoById(String id)
分页获取人脸列表
pageNum起始值为1
R<List<FaceVector>> listFaces(long pageNum, long pageSize)
# 单人脸场景
当仅需查询一张图片分数最高人脸,可以使用如下API:
适用于仅包含单张人脸的图像,或存在主次明显的人脸场景。
支持通过图片直接完成查询,内部流程为:人脸检测 → 提取分数最高人脸特征 → 查询人脸库。
//推荐使用
R<List<FaceSearchResult>> searchByTopFace(Image image, FaceSearchParams params);
//以下接口将在后续版本中移除
R<List<FaceSearchResult>> searchByTopFace(String imagePath, FaceSearchParams params);
R<List<FaceSearchResult>> searchByTopFace(BufferedImage sourceImage, FaceSearchParams params);
R<List<FaceSearchResult>> searchByTopFace(byte[] imageData, FaceSearchParams params);
也支持使用已提取的人脸特征进行查询:
List<FaceSearchResult> search(float[] feature, FaceSearchParams params);
# 绘制人脸搜索结果
displayField:指定 FaceRegisterInfo.metadata(JSON 格式)中需显示的字段。
default Image drawSearchResult(Image image, FaceSearchParams params, String displayField)
# FaceSearchResult字段说明
- 返回并非json格式,仅用于字段讲解
 {
   "id": "86dc0262-ea4f-4bff-b00e-b7b608afeb32", //人脸ID
   "metadata": "{\"name\":\"iu_update\",\"age\":\"25\"}", //人脸元数据
   "similarity": 0.9396009 //人脸相似度
}
人脸查询会依据不同模型的推荐相似度阈值进行判断。
不同模型的相似度阈值不同,请参考模型列表中提供的推荐阈值。
# 人脸删除
- 参数为调用register方法时的id
void removeRegister(String... keys);
# 清空人脸库
long clearFace();
# 人脸识别优化建议
人脸识别优化建议:
- 阈值调整与识别准确度权衡
阈值高:误识别率低,但可能漏识;
阈值低:识别率高,但误识别增加。
这导致调节阈值时很难两全,出现“怎么调都不理想”的尴尬情况。
- 人脸对齐的重要性
在特征提取前进行人脸对齐处理(如五官定位后仿射变换),可显著减少因角度、姿态等带来的干扰,使同一人的人脸特征在特征空间中更集中,从而:
降低阈值敏感性,提高识别稳定性;
SmartJavaAI 在特征提取前集成人脸对齐步骤,推荐在实际部署中启用。
- 底库质量
光靠调节阈值已不够,需回到人脸识别系统的关键——底库质量。
底库质量直接影响识别效果,需满足两个关键维度:
图像质量高:正面照、自然光、无遮挡、清晰无噪声,人脸部分建议≥128×128 像素;
成像环境一致:底库图片应尽量在与识别场景相同的摄像头/环境下采集(现场注册)。
现场注册同时满足图像质量和成像一致性,能显著提升实际识别表现。
- 避免影响识别的常见问题
(1)不要对人脸照片进行 PS、美图等失真处理;
(2)尽量避免浓妆,妆容会干扰特征提取;
(3)要保证底库照片与现场照片具备最基本的可辨识性。
简言之:人眼都难识别的,别强求算法能识别。
- 质量控制的双向性
上述底库要求同样适用于现场照片。特征比对是对称的,质量差的一方都会影响最终效果。
- 质量评估机制
借助 SmartJavaAI 提供的质量评估模块,可自动筛除不符合要求的低质量图片,从而显著提升识别效果与稳定性。质量评估
# 活体检测
活体检测技术主要是判别机器前出现的人脸是真实还是伪造的,其中借助其他媒介呈现的人脸都可以定义为虚假的人脸,包括打印的纸质照片、电子产品的显示屏幕、硅胶面具、立体的3D人像等。目前主流的活体解决方案分为配合式活体检测和非配合式活体检测(静默活体检测)。配合式活体检测需要用户根据提示完成指定的动作,然后再进行活体校验,静默活体则在用户无感的情况下直接进行活体校验。
注意事项:
1、活体识别内容增加了对图像清晰度的判断,但是还是有对其他方面的质量要求,比如人脸分辨率128x128以上,光照均匀,自然表情等。其中主要影响识别精度的为光照环境
2、由于活体检测通常需要在原有人脸框基础上扩展一定区域进行分析,因此当一张图片中包含多张人脸且人脸距离较近时,可能会导致区域重叠,从而影响活体检测结果的准确性。
# 获取活体检测模型:
LivenessConfig config = new LivenessConfig();
config.setModelEnum(LivenessModelEnum.MINI_VISION_MODEL);
//需替换为实际模型存储路径
config.setModelPath("C:/Users/Administrator/Downloads/sf3.0_models/sf3.0_models");
LivenessDetModel livenessDetModel = LivenessModelFactory.getInstance().getModel(config);
Image类说明:
所有接口中我们使用了一个Image类,用来表示图像,具体使用请查看Image类
# LivenessConfig参数说明
| 字段名称 | 字段类型 | 默认值 | 说明 |
|---|---|---|---|
| modelEnum | LivenessModelEnum | SEETA_FACE6_MODEL | 模型枚举 |
| modelPath | String | NULL | 手动指定离线模型路径 |
| device | DeviceEnum | CPU | 指定运行设备,支持 CPU/GPU |
| detectModel | FaceDetModel | 无 | 人脸检测模型 |
| realityThreshold | float | 无 | 人脸活体阈值,可选 |
| frameCount | int | 10 | 视频检测帧数,可选(检测视频时有效) |
| maxVideoDetectFrames | int | 不限制 | 视频最大检测帧数,可选(检测视频时有效) |
| customParams | Map<String, Object> | 无 | 个性化配置(按模型类型动态解析) |
注意事项:
1、Seetaface6活体识别时,如果清晰度低的话,就会直接返回:未知(UNKNOWN)。清晰度满足阈值,则判断真实度,超过阈值则认为是真人,低于阈值是非活体。
2、realityThreshold Seetaface6模型默认值为:0.8,其他模型默认值为:0.5。该值可根据实际需求灵活调整,数值越高,对真人的要求越严格。
3、小视科技比较特殊,需要两个模型配合使用:
//模型1路径:需替换为实际模型存储路径 config.setModelPath("2.7_80x80_MiniFASNetV2.onnx"); //SE模型路径:需替换为实际模型存储路径 config.putCustomParam("seModelPath", "4_0_0_80x80_MiniFASNetV1SE.onnx");
# 图片活体检测(多人脸)
R<DetectionResponse> detect(Image image)
# DetectionResponse字段说明
- 返回并非json格式,仅用于字段讲解
{
  "detectionInfoList": [ // 检测信息列表
    {
      "detectionRectangle": { //矩形框
        "height": 174, // 矩形高度
        "width": 147, // 矩形宽度
        "x": 275, // 左上角横坐标
        "y": 143 // 左上角纵坐标
      },
      "faceInfo": { // 人脸信息
        "keyPoints": [ // 5个人脸关键点:循序依次为,左眼中心、右眼中心、鼻尖、左嘴角和右嘴角
          {
            "x": 339.5083751678467,
            "y": 192.76402664184573
          },
          {
            "x": 404.7374267578125,
            "y": 197.89914321899414
          },
          {
            "x": 388.9555263519287,
            "y": 231.50675201416016
          },
          {
            "x": 339.8661708831787,
            "y": 265.51241302490234
          },
          {
            "x": 397.7071800231933,
            "y": 269.7657699584961
          }
        ],
        "livenessStatus": {
           "status": "LIVE", // 活体检测结果
           "score": 1.0 //分数
        }
      }
    }
  ]
}
# 图片活体检测(多人脸)- 基于已检测出的人脸区域和关键点
仅返回活体检测结果
//推荐使用
R<List<LivenessResult>> detect(Image image, DetectionResponse faceDetectionResponse)
# 图片活体检测(单人脸)- 基于已检测出的人脸区域和关键点
- imagePath:图片路径
- faceDetectionRectangle:人脸检测框(人脸检测返回结果)
- keyPoints:5个人脸关键点(人脸检测返回结果),部分模型不需要
R<LivenessResult> detect(Image image, DetectionRectangle faceDetectionRectangle, List<Point> keyPoints)
R<LivenessResult> detect(Image image, DetectionRectangle faceDetectionRectangle)
注意事项:
1、除Seetaface6模型外活体检测需要传入keyPoints,其他模型不需要
# 图片活体检测(分数最高人脸)
检测图片中分数最高的人脸
R<LivenessResult> detectTopFace(Image image)
# 视频活体检测
活体检测分为图片模式和视频模式,两种工作模式的区别在于前者属于一帧就是可以返回识别结果,而后者要输入多个视频帧然后返回识别结果。
LivenessStatus detectVideo(InputStream videoInputStream)
LivenessStatus detectVideo(String videoPath)
注意事项:
1、视频活体检测支持常见视频格式(推荐使用mp4),内部使用ffmpeg进行视频解析。
2、输入视频的有效帧数必须 > LivenessConfig 配置参数中 frameCount 的设定值(默认阈值:10帧)
3、若不满足帧数条件,接口将抛出异常
4、输入视频文件过大,会耗费内存,建议视频文件不要过大。
# LivenessStatus 活体检测返回结果枚举
| 枚举值 | 说明 |
|---|---|
| LIVE | 活体 |
| NON_LIVE | 非活体 |
| UNKNOWN | 未知,或者人脸清晰度低 |
| DETECTING | 视频模式,检测中 |
# 人脸属性检测
人脸属性检测包含:性别、年龄、口罩、眼睛状态(开闭)、脸部姿态(俯仰角,偏航角,翻滚角)
# 获取人脸属性检测模型:
FaceAttributeConfig config = new FaceAttributeConfig();
config.setModelEnum(FaceAttributeModelEnum.SEETA_FACE6_MODEL);
//需替换为实际模型存储路径
config.setModelPath("C:/Users/Administrator/Downloads/sf3.0_models/sf3.0_models");
FaceAttributeModel faceAttributeModel = FaceAttributeModelFactory.getInstance().getModel(config);
Image类说明:
所有接口中我们使用了一个Image类,用来表示图像,具体使用请查看Image类
# FaceAttributeConfig参数说明
| 字段名称 | 字段类型 | 默认值 | 说明 |
|---|---|---|---|
| modelEnum | FaceAttributeModelEnum | SEETA_FACE6_MODEL | 模型枚举,目前支持人脸属性检测的模型只有seetaface6模型 |
| modelPath | String | NULL | 手动指定离线模型路径 |
| enableAge | boolean | true | 是否启用年龄检测,可选 |
| enableGender | boolean | true | 是否启用性别检测,可选 |
| enableHeadPose | boolean | true | 是否启用人脸姿态检测,可选 |
| enableEyeStatus | boolean | true | 是否启用眼睛状态检测,可选 |
| enableMask | boolean | true | 是否启用口罩检测,可选 |
| device | DeviceEnum | CPU | 指定运行设备,支持 CPU/GPU |
# 人脸属性检测(多人脸)
返回人脸检测信息+人脸属性
//推荐使用
DetectionResponse detect(Image image)
//以下接口将在后续版本中移除
DetectionResponse detect(String imagePath)
DetectionResponse detect(BufferedImage image)
DetectionResponse detect(byte[] imageData)
# DetectionResponse字段说明
- 返回并非json格式,仅用于字段讲解
{
  "detectionInfoList": [ // 检测信息列表
    {
      "detectionRectangle": { //矩形框
        "height": 174, // 矩形高度
        "width": 147, // 矩形宽度
        "x": 275, // 左上角横坐标
        "y": 143 // 左上角纵坐标
      },
      "faceInfo": { // 人脸信息
        "faceAttribute": { //人脸属性
          "age": 44, //年龄
          "genderType": "FEMALE", //性别
          "headPose": { //脸部姿态
            "pitch": 12.958274,
            "roll": 0.19592644,
            "yaw": -4.166052
          },
          "leftEyeStatus": "OPEN",// 左眼开闭
          "rightEyeStatus": "OPEN",//右眼开闭
          "wearingMask": false //是否戴口罩
        },
        "keyPoints": [ // 5个人脸关键点:循序依次为,左眼中心、右眼中心、鼻尖、左嘴角和右嘴角
          {
            "x": 339.5083751678467,
            "y": 192.76402664184573
          },
          {
            "x": 404.7374267578125,
            "y": 197.89914321899414
          },
          {
            "x": 388.9555263519287,
            "y": 231.50675201416016
          },
          {
            "x": 339.8661708831787,
            "y": 265.51241302490234
          },
          {
            "x": 397.7071800231933,
            "y": 269.7657699584961
          }
        ]
      }
    }
  ]
}
# 人脸属性检测(多人脸)- 基于已检测出的人脸区域和关键点
仅返回人脸属性
//推荐使用
List<FaceAttribute> detect(Image image, DetectionResponse faceDetectionResponse)
//以下接口将在后续版本中移除
List<FaceAttribute> detect(String imagePath, DetectionResponse faceDetectionResponse)
List<FaceAttribute> detect(BufferedImage image,DetectionResponse faceDetectionResponse)
List<FaceAttribute> detect(byte[] imageData,DetectionResponse faceDetectionResponse)
# 人脸属性检测(单人脸)- 基于已检测出的人脸区域和关键点
- imagePath:图片路径
- faceDetectionRectangle:人脸检测框(人脸检测返回结果)
- keyPoints:5个人脸关键点(人脸检测返回结果)
//推荐使用
FaceAttribute detect(Image image, DetectionRectangle faceDetectionRectangle, List<Point> keyPoints)
//以下接口将在后续版本中移除
FaceAttribute detect(String imagePath, DetectionRectangle faceDetectionRectangle, List<Point> keyPoints)
FaceAttribute detect(BufferedImage image, DetectionRectangle faceDetectionRectangle, List<Point> keyPoints)
FaceAttribute detect(byte[] imageData, DetectionRectangle faceDetectionRectangle, List<Point> keyPoints)
# 人脸属性检测(分数最高人脸)
检测图片中分数最高的人脸
//推荐使用
LivenessStatus detectTopFace(Image image)
//以下接口将在后续版本中移除
LivenessStatus detectTopFace(BufferedImage image)
LivenessStatus detectTopFace(String imagePath)
LivenessStatus detectTopFace(byte[] imageData)
# FaceAttribute 字段讲解
| 字段名称 | 字段类型 | 说明 |
|---|---|---|
| genderType | GenderType | 性别枚举 |
| age | Integer | 年龄 |
| leftEyeStatus | EyeStatus | 左眼状态 |
| rightEyeStatus | EyeStatus | 右眼状态 |
| wearingMask | Boolean | 是否带口罩 |
| headPose | HeadPose | 姿态 |
# GenderType 性别枚举
| 枚举值 | 说明 |
|---|---|
| MALE | 男 |
| FEMALE | 女 |
| UNKNOWN | 未知 |
# EyeStatus 眼睛状态枚举
| 枚举值 | 说明 |
|---|---|
| OPEN | 睁眼 |
| CLOSED | 闭眼 |
| NON_EYE_REGION | 非眼部区域 |
| UNKNOWN | 未知 |
# HeadPose 姿态检测结果字段讲解
| 字段名称 | 字段类型 | 说明 |
|---|---|---|
| pitch | Float | 上下(俯仰角),正值抬头,负值低头 (-90°~+90°) |
| yaw | Float | 左右(偏航角),正值右偏,负值左偏(-90°~+90°) |
| roll | Float | 倾斜(翻滚角),正值右倾,负值左倾(-90°~+90°) |
# 绘制人脸属性检测结果并导出图片
通过 SmartJavaAI 提供的工具类 FaceUtils,你可以轻松地将检测到的人脸框和属性信息绘制到图片上,并导出保存。示例代码如下:
image:待处理的原始图像对象。
detectionResponse:人脸检测与属性识别的响应结果。
第三个参数为导出的目标文件路径(支持 PNG/JPG 格式)。
该方法将自动在图像上绘制人脸框、性别、年龄等属性信息,并将结果保存到指定路径。
FaceUtils.drawBoxesWithFaceAttribute(image, detectionResponse,"C:/Users/Administrator/Downloads/double_person_.png");
# 表情识别
人脸表情识别是一种基于计算机视觉与人工智能技术的分析方法,能够自动识别图像或视频中人脸所呈现的情绪状态。通过提取面部关键点、纹理变化等特征,模型可判断出常见的情绪类型,如高兴、愤怒、悲伤、惊讶等。该技术广泛应用于人机交互、心理分析、智能监控和教育辅导等领域。
# 获取表情识别模型:
FaceExpressionConfig config = new FaceExpressionConfig();
config.setModelEnum(ExpressionModelEnum.FrEmotion);
config.setModelPath("/Users/xxx/Documents/develop/model/emotion/fr_expression.onnx");
config.setDevice(device);
config.setAlign(true);
config.setDetectModel(getFaceDetModel());
ExpressionModel model = ExpressionModelFactory.getInstance().getModel(config);
# FaceExpressionConfig参数说明
| 字段名称 | 字段类型 | 默认值 | 说明 |
|---|---|---|---|
| modelEnum | ExpressionModelEnum | 无 | 模型枚举 |
| modelPath | String | NULL | 手动指定离线模型路径 |
| device | DeviceEnum | CPU | 指定运行设备,支持 CPU/GPU |
| detectModel | FaceDetModel | 无 | 人脸检测模型 |
| cropFace | boolean | true | 是否对输入图片中的人脸进行裁剪。推荐对原始图像开启此项,以提取更精确的特征。若图像已是标准人脸区域,可关闭以提升效率。 |
| align | boolean | false | 是否进行人脸对齐。仅在 cropFace = true 时生效。若人脸角度较正,建议关闭可提升性能;若角度偏差大,建议开启提高准确性。 |
注意事项:
1、如果输入的图片未经过人脸矫正,则请务必设置 align = true,否则特征提取结果可能不准确。
2、如果图片未经过人脸裁剪,则请务必设置 cropFace = true,否则特征提取结果可能不准确。
# 表情识别(多人脸)
//推荐使用
R<DetectionResponse> detect(Image image)
//以下接口将在后续版本中移除
R<DetectionResponse> detect(String imagePath)
R<DetectionResponse> detect(BufferedImage image)
R<DetectionResponse> detect(byte[] imageData)
R<DetectionResponse> detectBase64(String base64Image)
Image类说明:
所有接口中我们使用了一个Image类,用来表示图像,具体使用请查看Image类
# DetectionResponse字段说明
- 返回并非json格式,仅用于字段讲解
{
  "detectionInfoList": [ // 检测信息列表
    {
      "detectionRectangle": { //矩形框
        "height": 174, // 矩形高度
        "width": 147, // 矩形宽度
        "x": 275, // 左上角横坐标
        "y": 143 // 左上角纵坐标
      },
      "faceInfo": { // 人脸信息
         "expressionResult": {
            "expression": "ANGRY", //表情枚举
            "score": 1.0 // 分数
         },
        "keyPoints": [
          {
            "x": 339.5083751678467,
            "y": 192.76402664184573
          },
          {
            "x": 404.7374267578125,
            "y": 197.89914321899414
          },
          {
            "x": 388.9555263519287,
            "y": 231.50675201416016
          },
          {
            "x": 339.8661708831787,
            "y": 265.51241302490234
          },
          {
            "x": 397.7071800231933,
            "y": 269.7657699584961
          }
        ]
      }
    }
  ]
}
# 人脸表情识别(多人脸)- 基于已检测出的人脸区域和关键点
仅返回表情识别结果
//推荐使用
R<List<ExpressionResult>> detect(Image image, DetectionResponse faceDetectionResponse)
//以下接口将在后续版本中移除
R<List<ExpressionResult>> detect(String imagePath, DetectionResponse faceDetectionResponse)
R<List<ExpressionResult>> detect(BufferedImage image,DetectionResponse faceDetectionResponse)
R<List<ExpressionResult>> detect(byte[] imageData,DetectionResponse faceDetectionResponse)
R<List<ExpressionResult>> detectBase64(String base64Image, DetectionResponse faceDetectionResponse)
ExpressionResult字段讲解
| 字段名称 | 字段类型 | 说明 |
|---|---|---|
| expression | FacialExpression | 表情枚举 |
| score | float | 分数 |
FacialExpression表情枚举
| 枚举常量 | 英文名称 | 中文含义 |
|---|---|---|
| ANGRY | angry | 愤怒 |
| DISGUST | disgust | 厌恶 |
| FEAR | fear | 害怕 |
| HAPPY | happy | 高兴 |
| SAD | sad | 伤心 |
| SURPRISE | surprise | 惊讶 |
| NEUTRAL | neutral | 中性 |
# 人脸表情识别(单人脸)- 基于已检测出的人脸区域和关键点
- imagePath:图片路径
- faceDetectionRectangle:人脸检测框(人脸检测返回结果)
- keyPoints:5个人脸关键点(人脸检测返回结果),部分模型不需要
//推荐使用
R<ExpressionResult> detect(Image image, DetectionRectangle faceDetectionRectangle, List<Point> keyPoints)
//以下接口将在后续版本中移除
R<ExpressionResult> detect(String imagePath, DetectionRectangle faceDetectionRectangle, List<Point> keyPoints)
R<ExpressionResult> detect(BufferedImage image, DetectionRectangle faceDetectionRectangle, List<Point> keyPoints)
R<ExpressionResult> detect(byte[] imageData, DetectionRectangle faceDetectionRectangle, List<Point> keyPoints)
R<ExpressionResult> detectBase64(String base64Image, DetectionRectangle faceDetectionRectangle, List<Point> keyPoints)

//推荐使用
R<ExpressionResult> detect(Image image, DetectionRectangle faceDetectionRectangle)
//以下接口将在后续版本中移除
R<ExpressionResult> detect(String imagePath, DetectionRectangle faceDetectionRectangle)
R<ExpressionResult> detect(BufferedImage image, DetectionRectangle faceDetectionRectangle)
R<ExpressionResult> detect(byte[] imageData, DetectionRectangle faceDetectionRectangle)
R<ExpressionResult> detectBase64(String base64Image, DetectionRectangle faceDetectionRectangle)
# 人脸表情识别(分数最高人脸)
检测图片中分数最高的人脸
//推荐使用
R<ExpressionResult> detectTopFace(Image image)
//以下接口将在后续版本中移除
R<ExpressionResult> detectTopFace(BufferedImage image)
R<ExpressionResult> detectTopFace(String imagePath)
R<ExpressionResult> detectTopFace(byte[] imageData)
R<ExpressionResult> detectTopFaceBase64(String base64Image)
# 人脸质量评估
目前仅支持Seetaface6质量评估模型,SeetaFace6开放的质量评估模块包含:亮度评估、清晰度评估、完整度评估、清晰度评估(深度)、姿态评估、姿态评估(深度)、分辨率评估。
亮度评估
亮度评估就是评估人脸区域内的亮度值是否均匀正常,存在部分或全部的过亮和过暗都会是评价为LOW。
清晰度评估
清晰度这里是传统方式通过二次模糊后图像信息损失程度统计的清晰度。
完整度评估
完整度评估是朴素的判断人来是否因为未完全进入摄像头而造成的不完整的情况。该方法不适用于判断遮挡造成的不完整。 判断方式为对人脸检测框周围做扩展,如果扩展超过了图像边缘,则认为该图像是处于边缘不完整的人脸。
姿态评估
这里的姿态评估器是传统方式,通过人脸5点坐标值来判断姿态是否为正面。
姿态评估(深度)
这里的姿态评估器是深度学习方式,通过回归人头部在yaw、pitch、roll三个方向的偏转角度来评估人脸是否是正面。
分辨率评估
这个是质量评估模块里相对最简单的部分了,就是判断人脸部分的分辨率。
# 获取质量评估模型:
QualityConfig config = new QualityConfig();
config.setModelEnum(QualityModelEnum.SEETA_FACE6_MODEL);
config.setModelPath("C:/Users/Administrator/Downloads/sf3.0_models/sf3.0_models");
config.setDevice(device);
FaceQualityModel faceQualityModel = FaceQualityModelFactory.getInstance().getModel(config);
# QualityConfig参数说明
| 字段名称 | 字段类型 | 默认值 | 说明 |
|---|---|---|---|
| modelEnum | QualityModelEnum | 无 | 模型枚举 |
| modelPath | String | NULL | 手动指定离线模型路径 |
| device | DeviceEnum | CPU | 指定运行设备,支持 CPU/GPU |
# 亮度评估
//推荐使用
R<FaceQualityResult> evaluateBrightness(Image image, DetectionRectangle rectangle, List<Point> keyPoints)
//以下接口将在后续版本中移除
R<FaceQualityResult> evaluateBrightness(BufferedImage image, DetectionRectangle rectangle, List<Point> keyPoints)
R<FaceQualityResult> evaluateBrightness(byte[] imageData, DetectionRectangle rectangle, List<Point> keyPoints)
R<FaceQualityResult> evaluateBrightness(String imagePath, DetectionRectangle rectangle, List<Point> keyPoints)
Image类说明:
所有接口中我们使用了一个Image类,用来表示图像,具体使用请查看Image类
# 清晰度评估
//推荐使用
R<FaceQualityResult> evaluateClarity(Image image, DetectionRectangle rectangle, List<Point> keyPoints)
//以下接口将在后续版本中移除
R<FaceQualityResult> evaluateClarity(BufferedImage image, DetectionRectangle rectangle, List<Point> keyPoints)
R<FaceQualityResult> evaluateClarity(byte[] imageData, DetectionRectangle rectangle, List<Point> keyPoints)
R<FaceQualityResult> evaluateClarity(String imagePath, DetectionRectangle rectangle, List<Point> keyPoints)
# 清晰度评估(深度学习)
//推荐使用
R<ClarityDLResult> evaluateClarityWithDL(Image image, DetectionRectangle rectangle, List<Point> keyPoints)
//以下接口将在后续版本中移除
R<ClarityDLResult> evaluateClarityWithDL(BufferedImage image, DetectionRectangle rectangle, List<Point> keyPoints)
R<ClarityDLResult> evaluateClarityWithDL(byte[] imageData, DetectionRectangle rectangle, List<Point> keyPoints)
R<ClarityDLResult> evaluateClarityWithDL(String imagePath, DetectionRectangle rectangle, List<Point> keyPoints)
ClarityDLResult字段讲解
| 属性名 | 类型 | 说明 |
|---|---|---|
| lightstate | QualityOfLBN.LIGHTSTATE | 表示图像的光照状态 |
| blurstate | QualityOfLBN.BLURSTATE | 表示图像的模糊状态 |
| noisestate | QualityOfLBN.NOISESTATE | 表示图像的噪声状态 |
噪声状态:
| 枚举值 | 说明 |
|---|---|
| HAVENOISE | 图像存在噪声 |
| NONOISE | 图像无噪声 |
模糊状态
| 枚举值 | 说明 |
|---|---|
| CLEAR | 图像清晰 |
| BLUR | 图像模糊 |
光照状态
| 枚举值 | 说明 |
|---|---|
| BRIGHT | 图像过亮 |
| DARK | 图像过暗 |
# 完整度评估
//推荐使用
R<FaceQualityResult> evaluateCompleteness(Image image, DetectionRectangle rectangle, List<Point> keyPoints)
//以下接口将在后续版本中移除
R<FaceQualityResult> evaluateCompleteness(BufferedImage image, DetectionRectangle rectangle, List<Point> keyPoints)
R<FaceQualityResult> evaluateCompleteness(byte[] imageData, DetectionRectangle rectangle, List<Point> keyPoints)
R<FaceQualityResult> evaluateCompleteness(String imagePath, DetectionRectangle rectangle, List<Point> keyPoints)
# 人脸姿态评估
//推荐使用
R<FaceQualityResult> evaluatePose(Image image, DetectionRectangle rectangle, List<Point> keyPoints)
//以下接口将在后续版本中移除
R<FaceQualityResult> evaluatePose(BufferedImage image, DetectionRectangle rectangle, List<Point> keyPoints)
R<FaceQualityResult> evaluatePose(byte[] imageData, DetectionRectangle rectangle, List<Point> keyPoints)
R<FaceQualityResult> evaluatePose(String imagePath, DetectionRectangle rectangle, List<Point> keyPoints)
# 人脸姿态评估(深度学习)
//推荐使用
R<FaceQualityResult> evaluatePoseWithDL(Image image, DetectionRectangle rectangle, List<Point> keyPoints)
//以下接口将在后续版本中移除
R<FaceQualityResult> evaluatePoseWithDL(BufferedImage image, DetectionRectangle rectangle, List<Point> keyPoints)
R<FaceQualityResult> evaluatePoseWithDL(byte[] imageData, DetectionRectangle rectangle, List<Point> keyPoints)
R<FaceQualityResult> evaluatePoseWithDL(String imagePath, DetectionRectangle rectangle, List<Point> keyPoints)
# 人脸分辨率评估
//推荐使用
R<FaceQualityResult> evaluateResolution(Image image, DetectionRectangle rectangle, List<Point> keyPoints)
//以下接口将在后续版本中移除
R<FaceQualityResult> evaluateResolution(BufferedImage image, DetectionRectangle rectangle, List<Point> keyPoints)
R<FaceQualityResult> evaluateResolution(byte[] imageData, DetectionRectangle rectangle, List<Point> keyPoints)
R<FaceQualityResult> evaluateResolution(String imagePath, DetectionRectangle rectangle, List<Point> keyPoints)
参数讲解:
- faceDetectionRectangle:人脸检测框(人脸检测返回结果)
- keyPoints:5个人脸关键点(人脸检测返回结果)
FaceQualityResult字段讲解
| 字段名称 | 字段类型 | 说明 |
|---|---|---|
| grade | QualityGrade | 亮度分数 |
| score | float | 质量等级枚举 |
QualityGrade枚举
| 枚举常量 | 描述 |
|---|---|
| LOW | 低 |
| MEDIUM | 中等 |
| HIGH | 高 |